In Genshin Impact Project Connectivity is a 3.6 patch event and part of "Celebrations of the Mind". As part of it, you will need to build roads, and then test them, passing through control points. The more building points you have left, the higher the score will be. As a reward, you will receive Source Stones, Ascension Materials, and Gala Excitement. In this guide, we will tell you how to go through all its stages.
Basic Information on Path Design
How to start an event
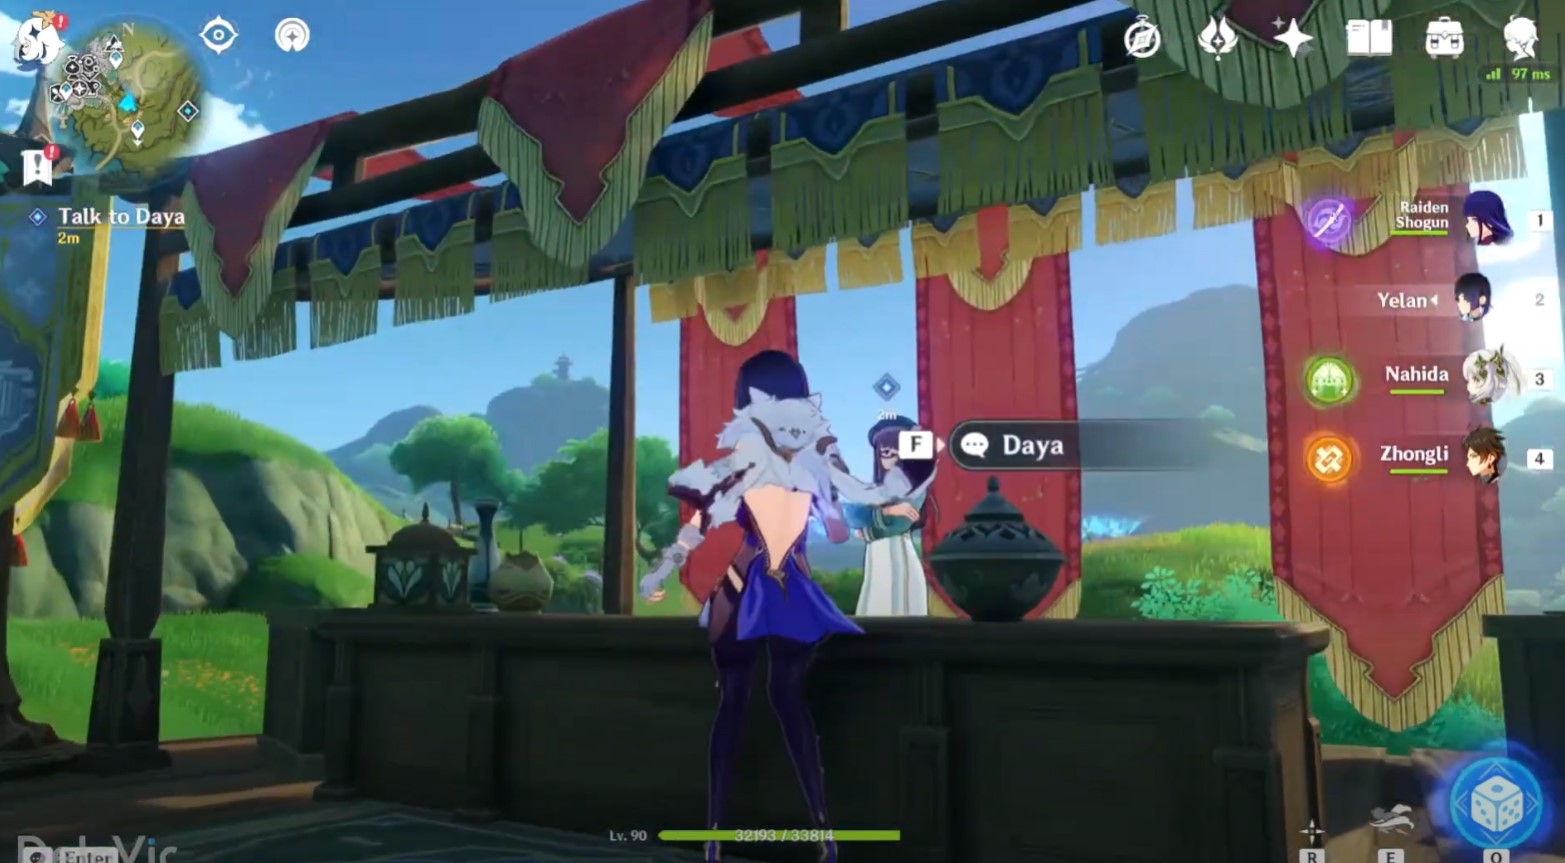
First of all, you will need to complete the Opening Festivities quest, which allows you to access all the challenges of the main event. Next, you need to take on the mission "Project Connectivity". You just have to talk with the scholar Daya from the darshan of Kshahrewar, who can be found east of the city of Sumeru. Completing the quest will reward you with 10,000 mora and 4 adventurer experience.
The essence and Contest Rules of the event
While in Build Mode, you will need to spend Build Points to build a road. Then the test mode will begin, in which you have to test the created path, passing through the checkpoints in any order.
Try not to leave the created buildings in test mode. If you fall, you will be transferred to the start or checkpoint. To successfully complete the Achievement: Challenger, you need to go through all the checkpoints. Your final score will depend on the number of construction points saved.

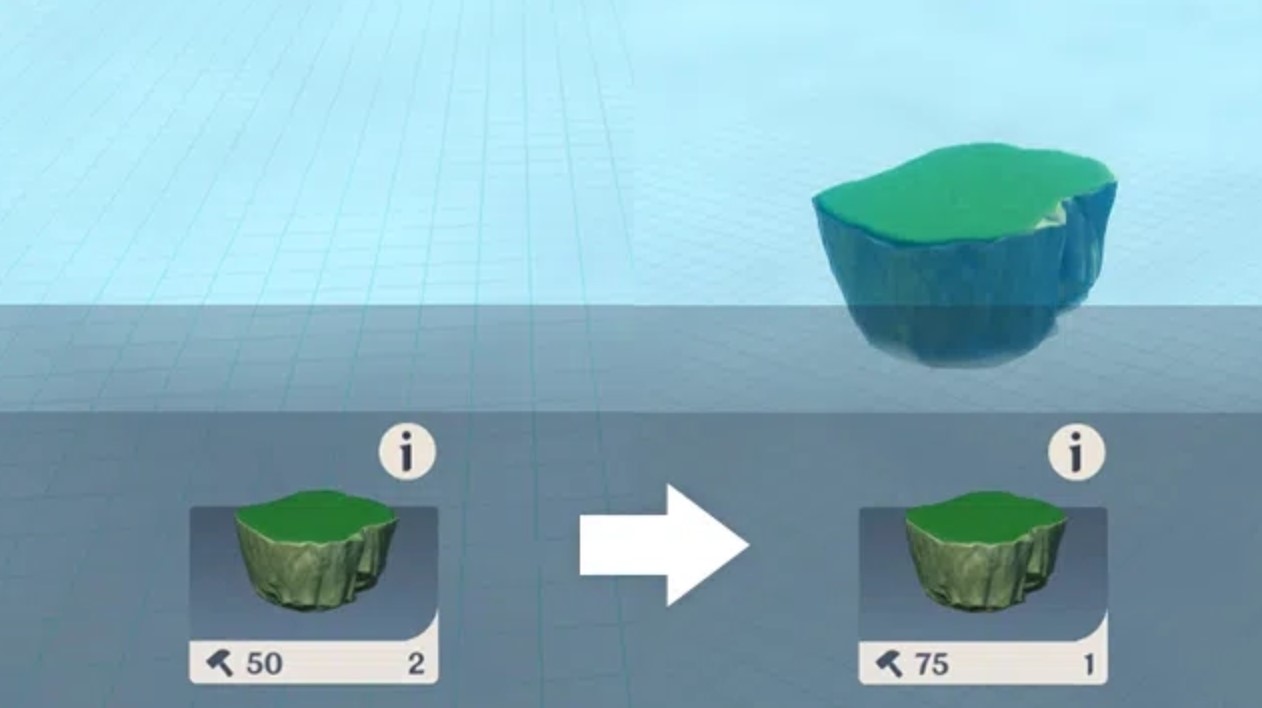
It should also be remembered that when the same material is reused, its The Price will increase. For this reason, you should try to use different materials to create the most efficient path.
Project Connectivity I
Best route
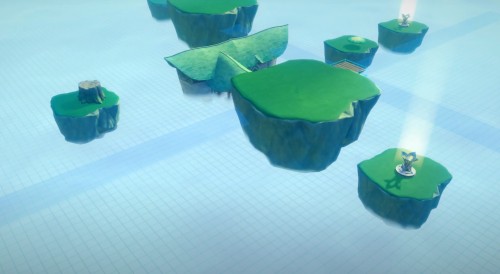
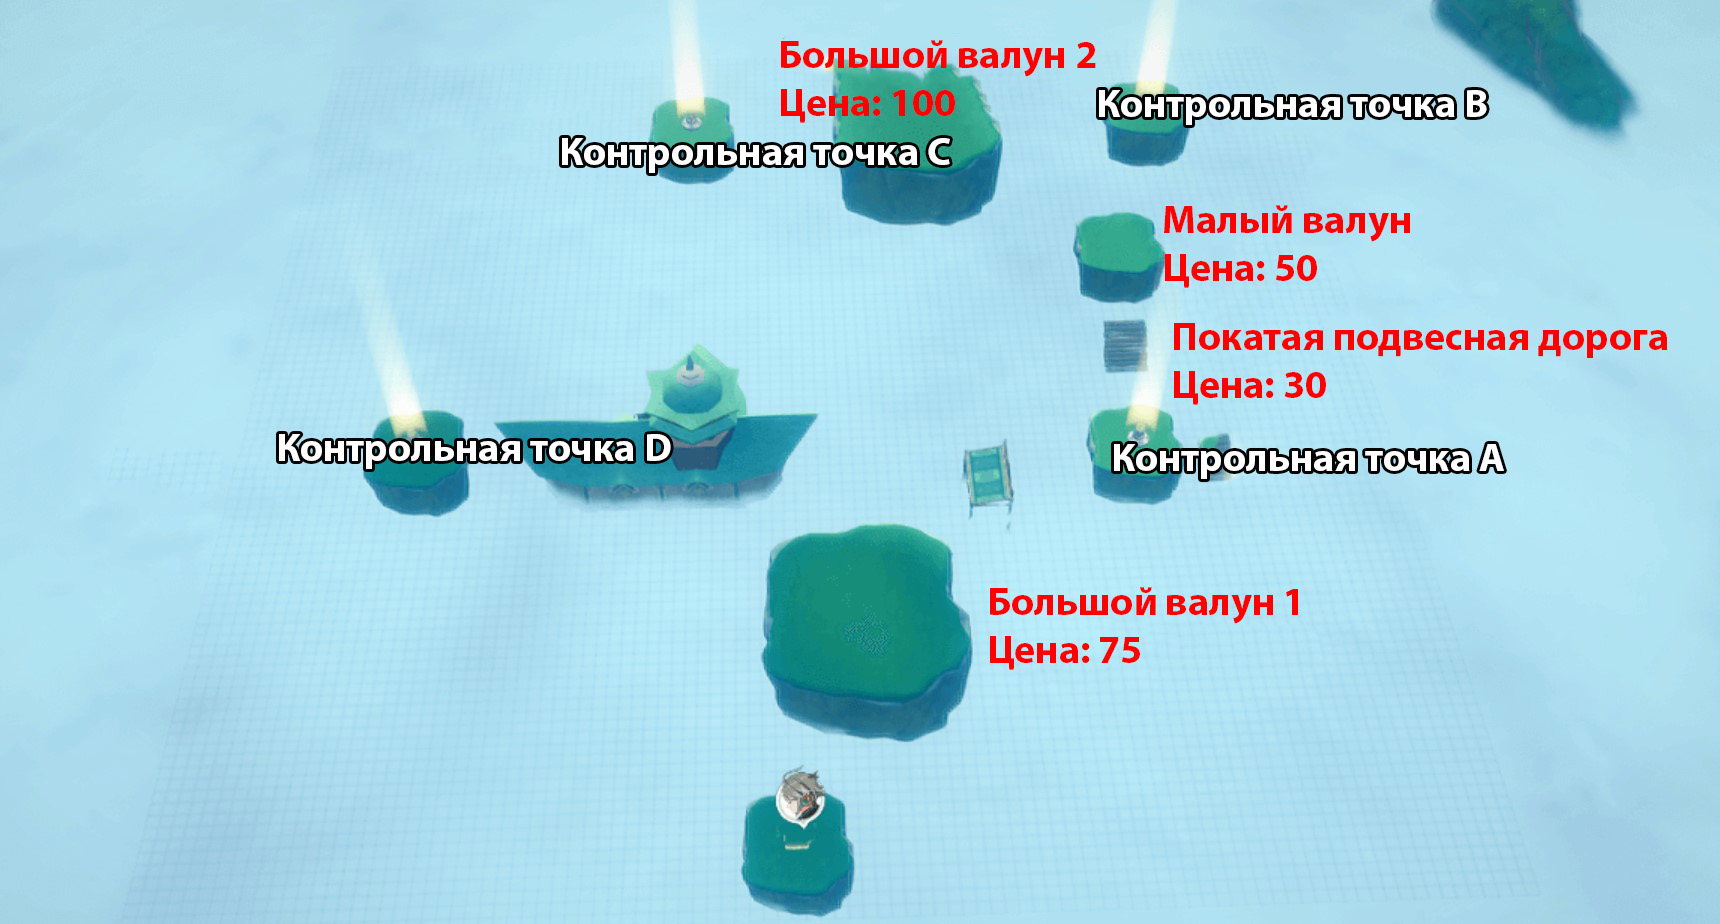
The picture below shows the optimal use of materials (only apply big and small boulders ) that allows you to create a route in just 300 building points. Next, we will consider its construction in detail.
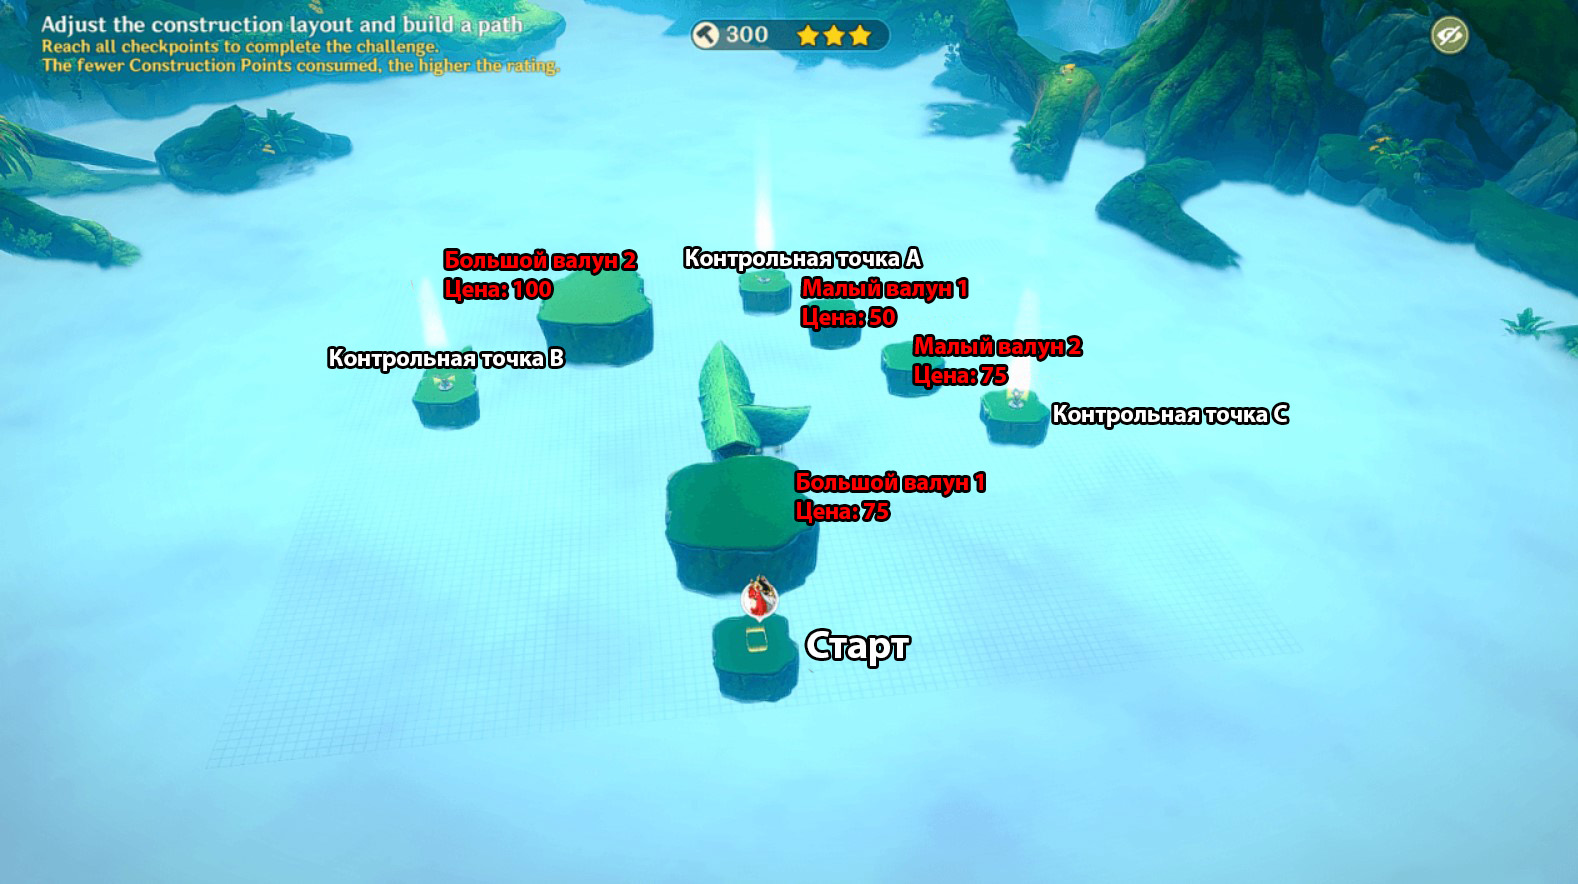
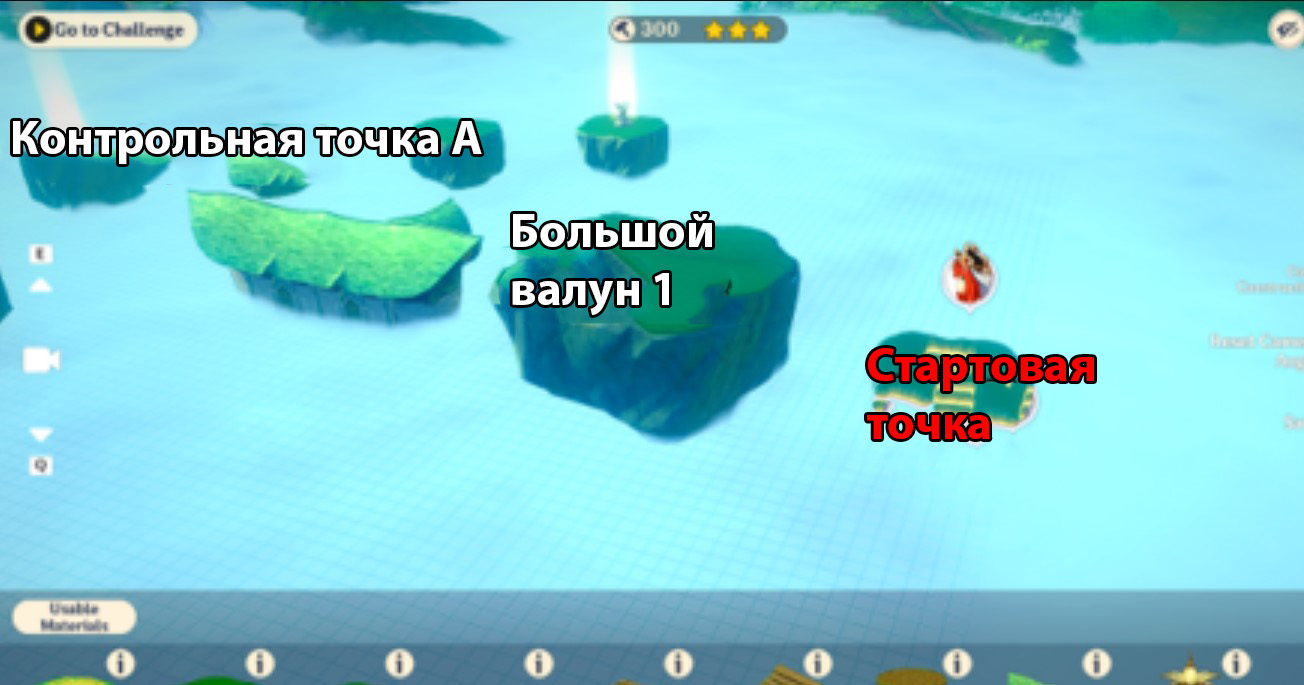
Place one large boulder right between the starting point and the hotel. Align the island on the vertical axis so that you can fly from it to the building ahead, but do not place it too high.
Then place a second large boulder between control points A and B. Finally, place two small boulders between control points A and C. Make sure they are equidistant from each other, otherwise it will be extremely difficult for you to jump from one platform to another.

How to pass along the created road
First of all, sort out the large boulder that you set near the starting point. Then fly from it to the hotel. Next, climb onto the second large boulder on the left side.
Now move to the control point B, located on the left.
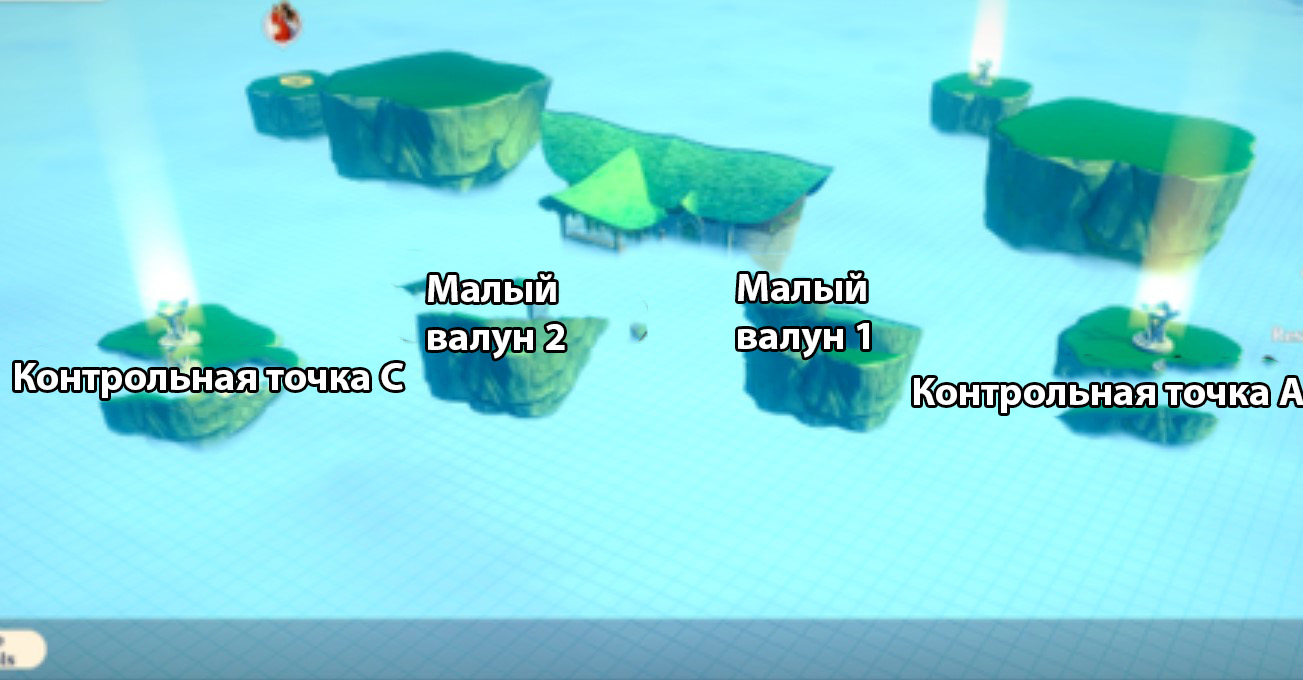
Head back to the second large boulder and then glide to checkpoint A.
Use two small boulders to get to the last checkpoint C.
After completing the Achievement: Challenger, do not forget to collect the reward on the event page.
Project Connectivity II
Best route
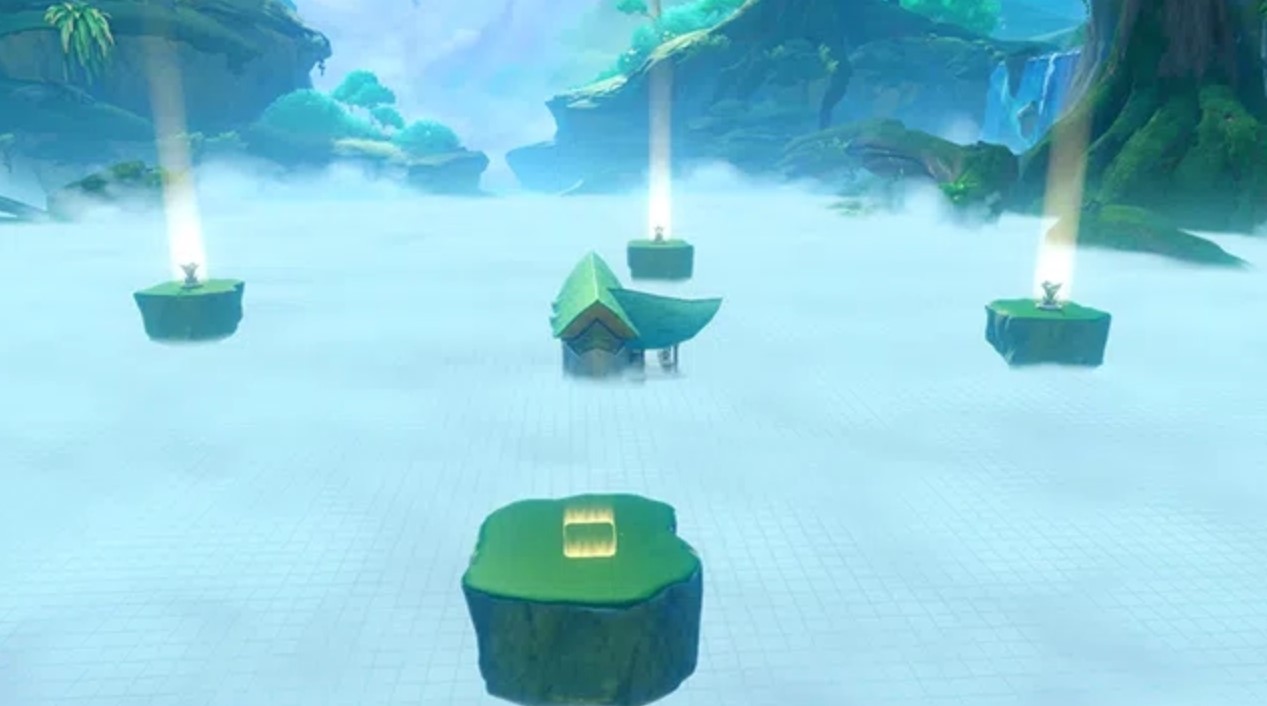
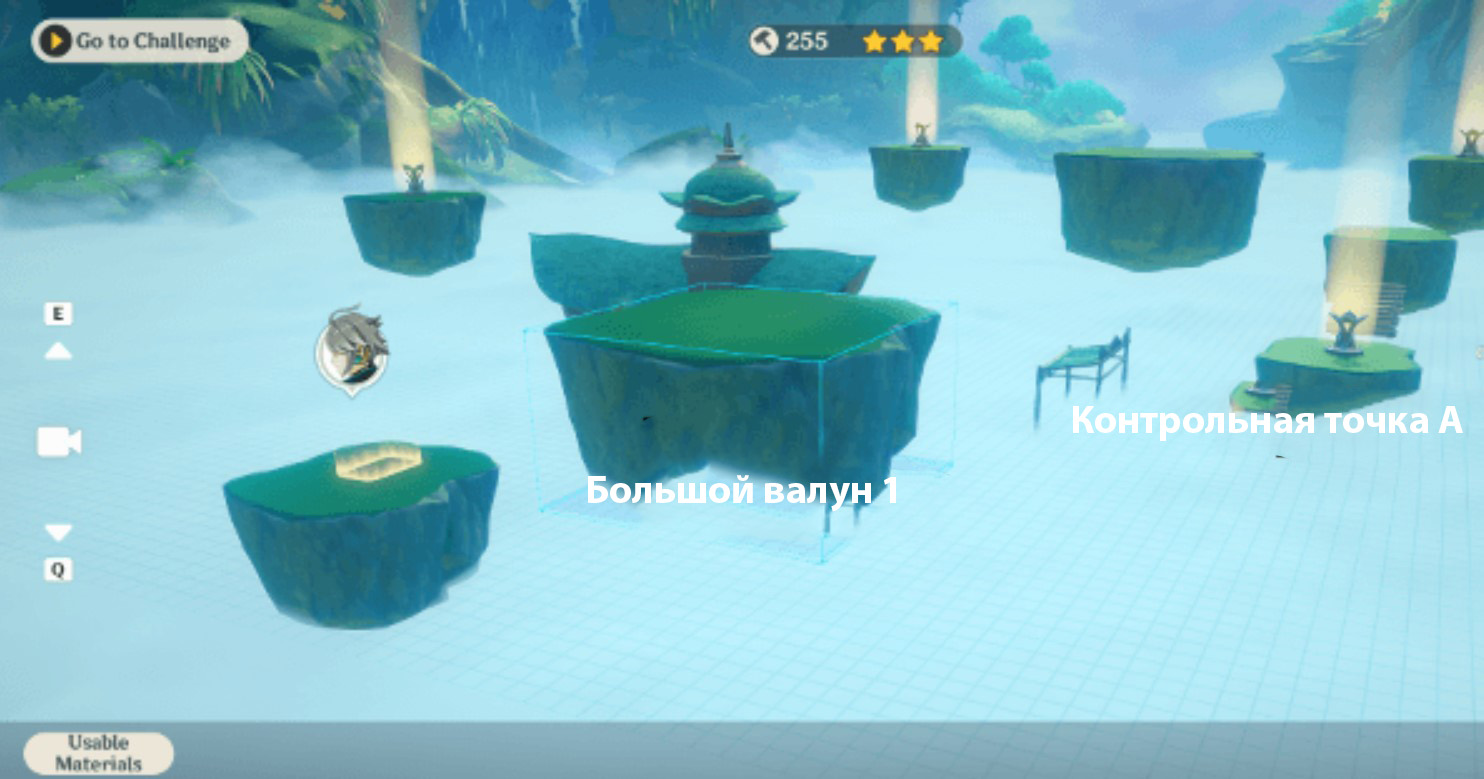
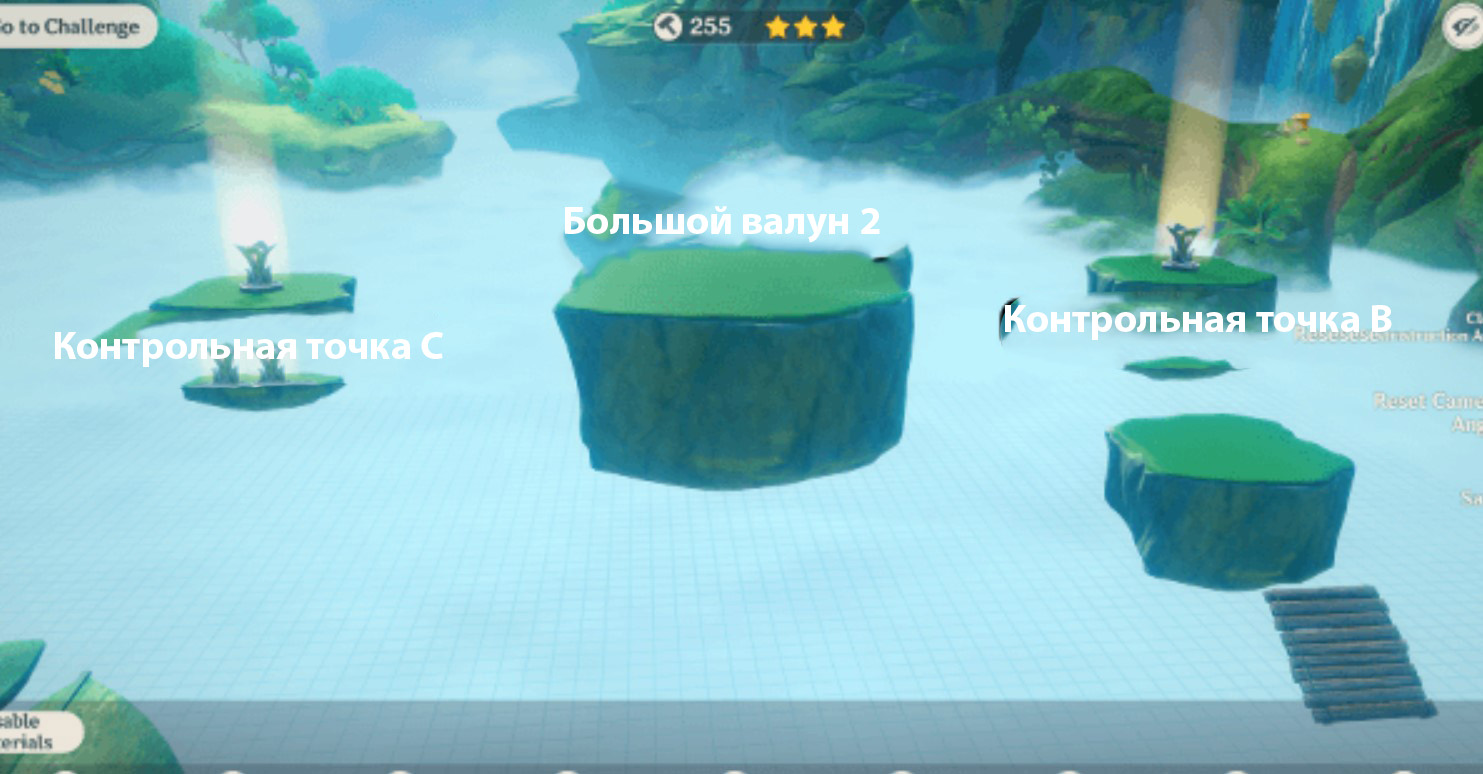
The picture below shows the optimal use of materials (only large and small boulders and a sloping cableway are used), allowing you to create a route for only 255 building points. Next, we will consider its construction in detail.
Place one large boulder between the starting point and control point "A". It can also be installed between a hotel already on the map if you plan to use a longer route. As for altitude, position the island so that you can jump on it and then glide down and fly to "A".
To get to the control point "B" from "A" you will need to set up a sloping cableway and a small boulder so that you can gain height and jump to the desired island. If necessary, you can also place a Four-Leaf Sigil or a jumping Mushroom - you still won't go beyond 800 points.

Next, place a large boulder between control points "B" and "C". In terms of height, it should coincide with the islands on which the lighthouses are installed. As for the control point "D", no additional objects need to be placed for it, since you can get to it from the hotel.
How to pass along the created road
From the starting point, climb onto the large boulder, and then glide to the checkpoint "A".
Now jump onto the sloping path, and from it onto a small boulder. Then jump to the island with the lighthouse "B".
From the control point "B" fly over to the second large boulder, and from it to the lighthouse "C".
Next, glide onto the roof of the inn below and cross over to the island with the last checkpoint "D".
After completing the Achievement: Challenger, do not forget to collect the reward on the event page.
Project Connectivity III
Best route
The picture below shows the optimal use of materials (only large and small boulders are used, as well as a cableway and a jumping Mushroom), allowing you to create a route for only 300 building points. Next, we will consider its construction in detail.
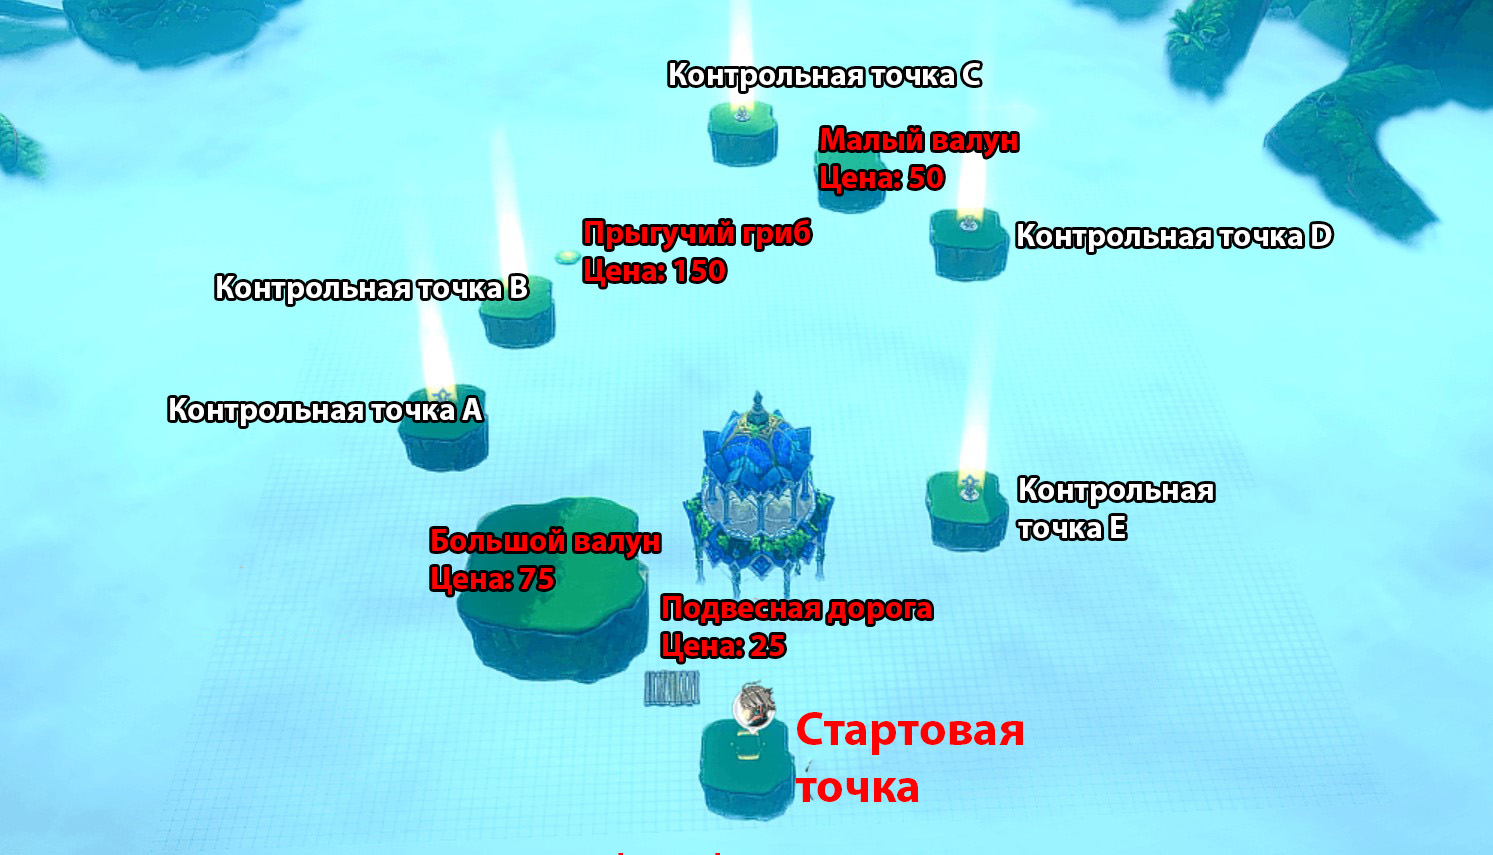
Place one large boulder and cableway between the start platform and checkpoint "A". Make sure both materials are equidistant from each other to cover the entire dip. At the same time, the island should be slightly raised so that you can then get to point "A".
The empty area between control points "B" and "C" is very large, so we advise you to put a jumping Mushroom here. The main thing is not to put it too far from the control point "B", otherwise you simply will not jump to it.
Next, place a small boulder between control points "C" and "D". It will be enough, since these islands are located at the same height and not far from each other.
How to pass along the created road
From the starting point, jump onto the cable car and then climb onto the large boulder. From it, plan to the island with point "A" and go upstairs.
From point A, simply glide down to the island with lighthouse B.
Now jump on the bouncy Mushroom to gain altitude and start flying towards the "C" point.
Jump from the island to the small boulder, and from it get to the lighthouse "D".
At the end, you just need to jump down from the island and fly to the checkpoint "E" below.
After completing the Achievement: Challenger, do not forget to collect the reward on the event page.
Comments
You need to login to add comments.
You can login with