In Genshin Impact, the Jadeplume Terrorshroom is a huge bird-like monster and elite boss from Sumeru, added to the game With You the release of version 3.0. It drops the Nagadus Emeralds and the Majestic Hooked Beak, which are needed to exalt some characters. In this guide, you will find out where you can find this dangerous predator and how to defeat it.
Where to find Feathered Mold in Genshin Impact
You can find it in one of the Sumeru locations. According to the story, you will have to get to this area as part of an archon quest called "Through Smoke and Dark Woods". However, in reality, you can come here after Liyue research, that is, even before Inazuma. After that, just head to the eastern part of the Dendro region.
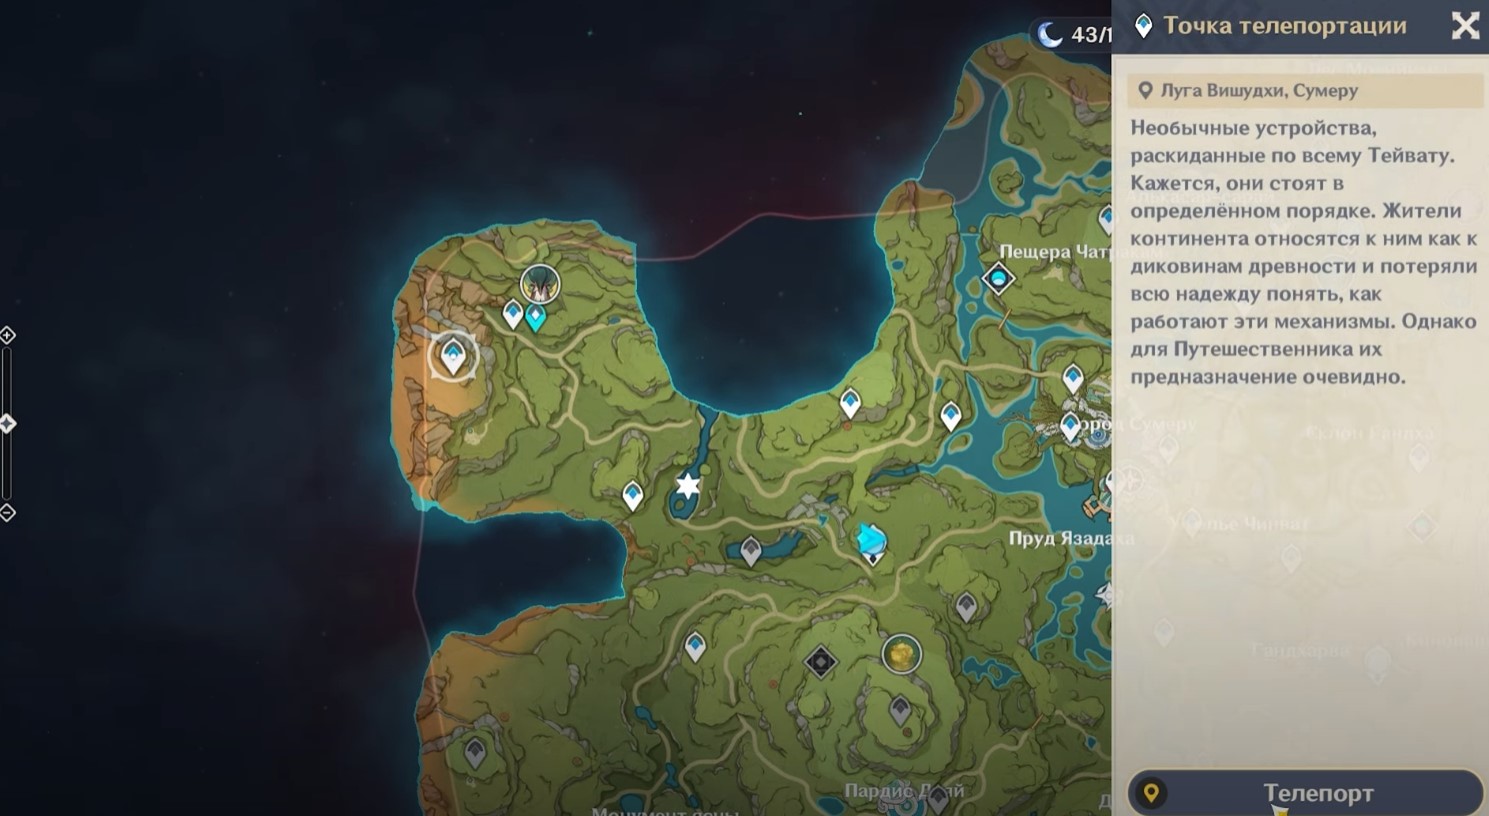
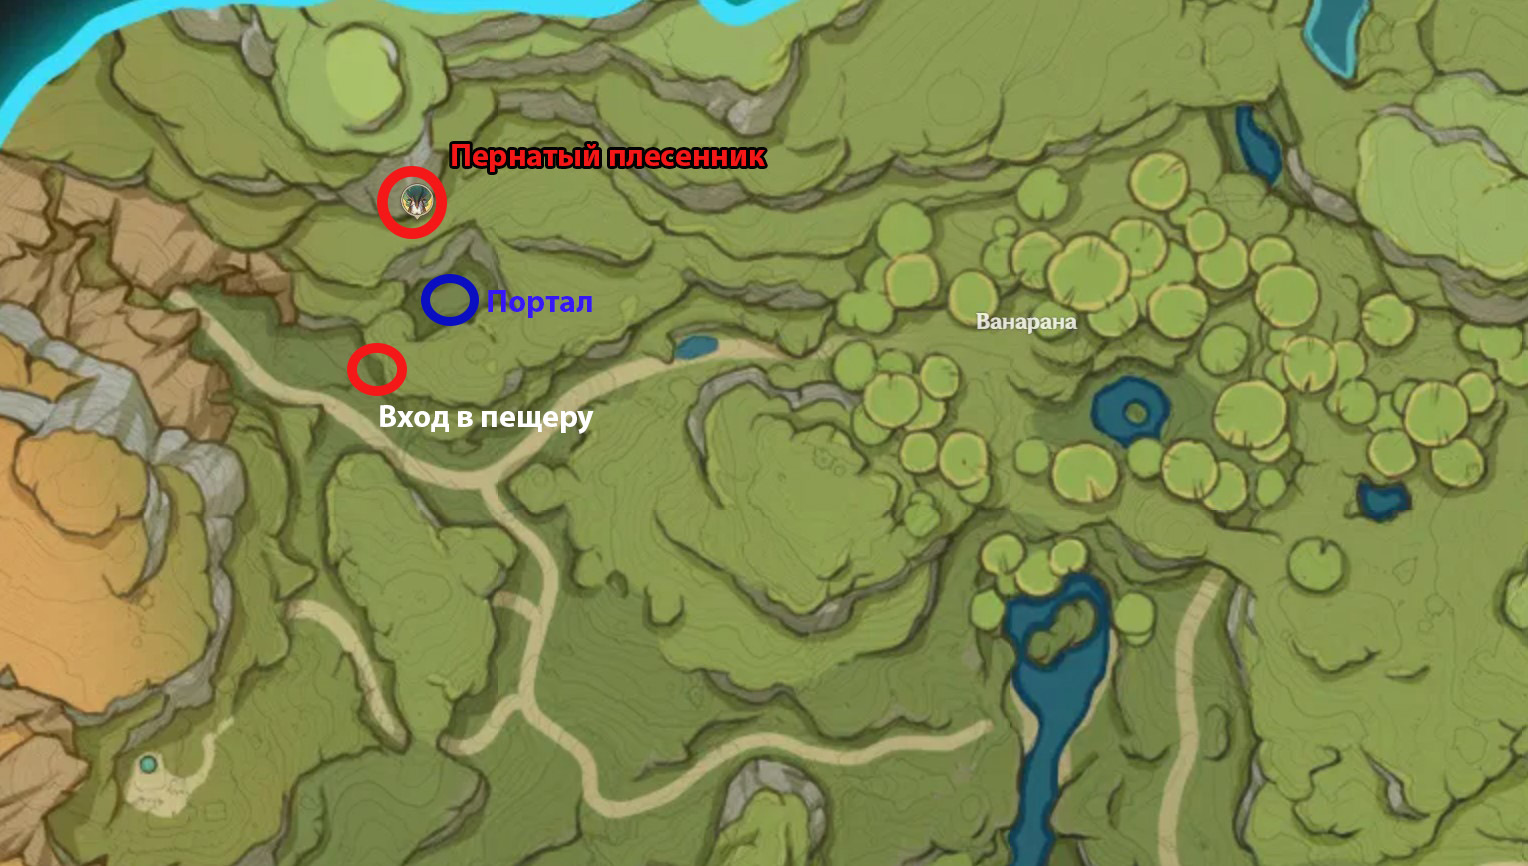
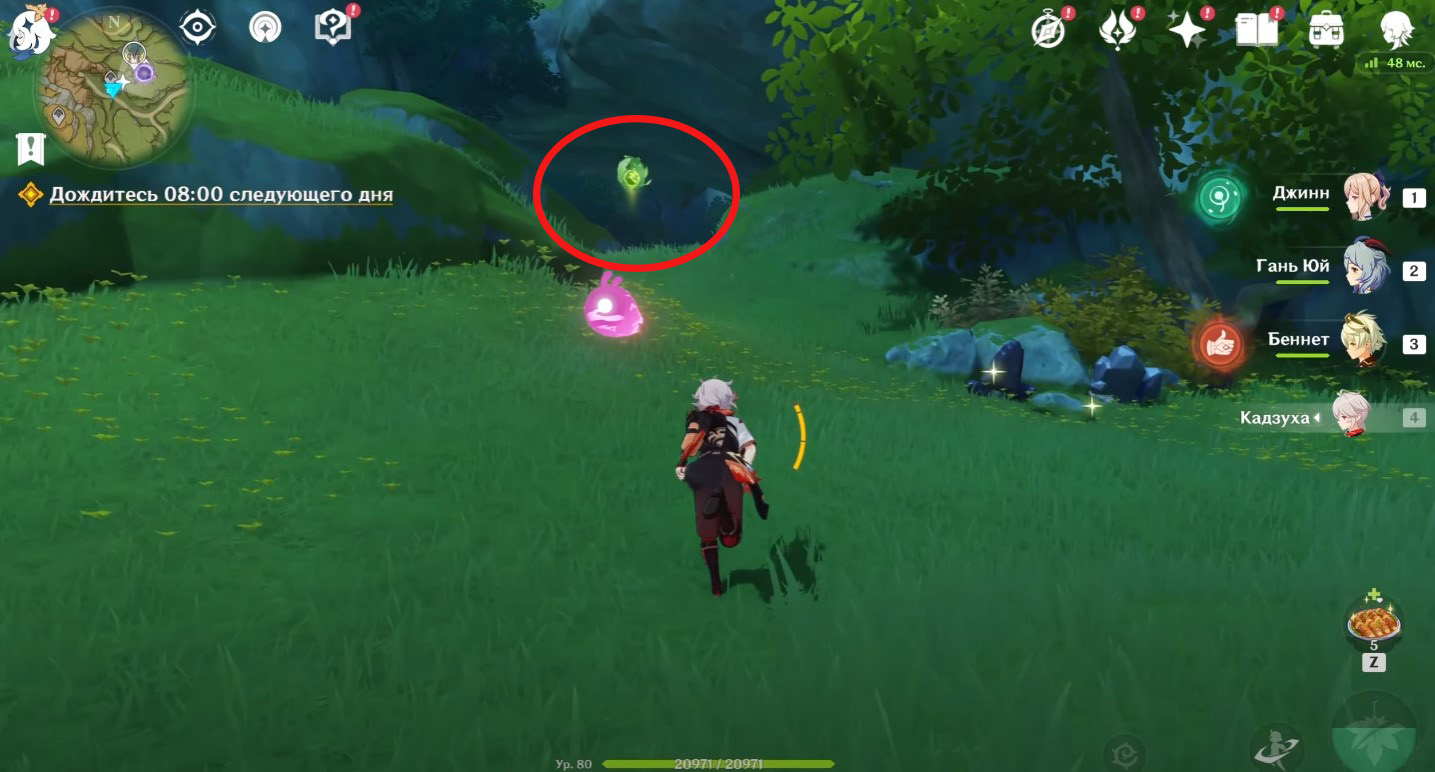
The boss is located west of the capital Sumeru in the location of Wanaran, which, by the way, also does not need to be opened. There are two ways to get to the Feathered Mold itself. Let's describe the easiest method first: move to the teleportation point shown in the screenshots below, run a little to the east, jump off the cliff and keep flying forward to the portal below. After flying up to the blue-black hole in the sky, use the four-leaf symbol to fly into it and get to the area where the boss arena is located.


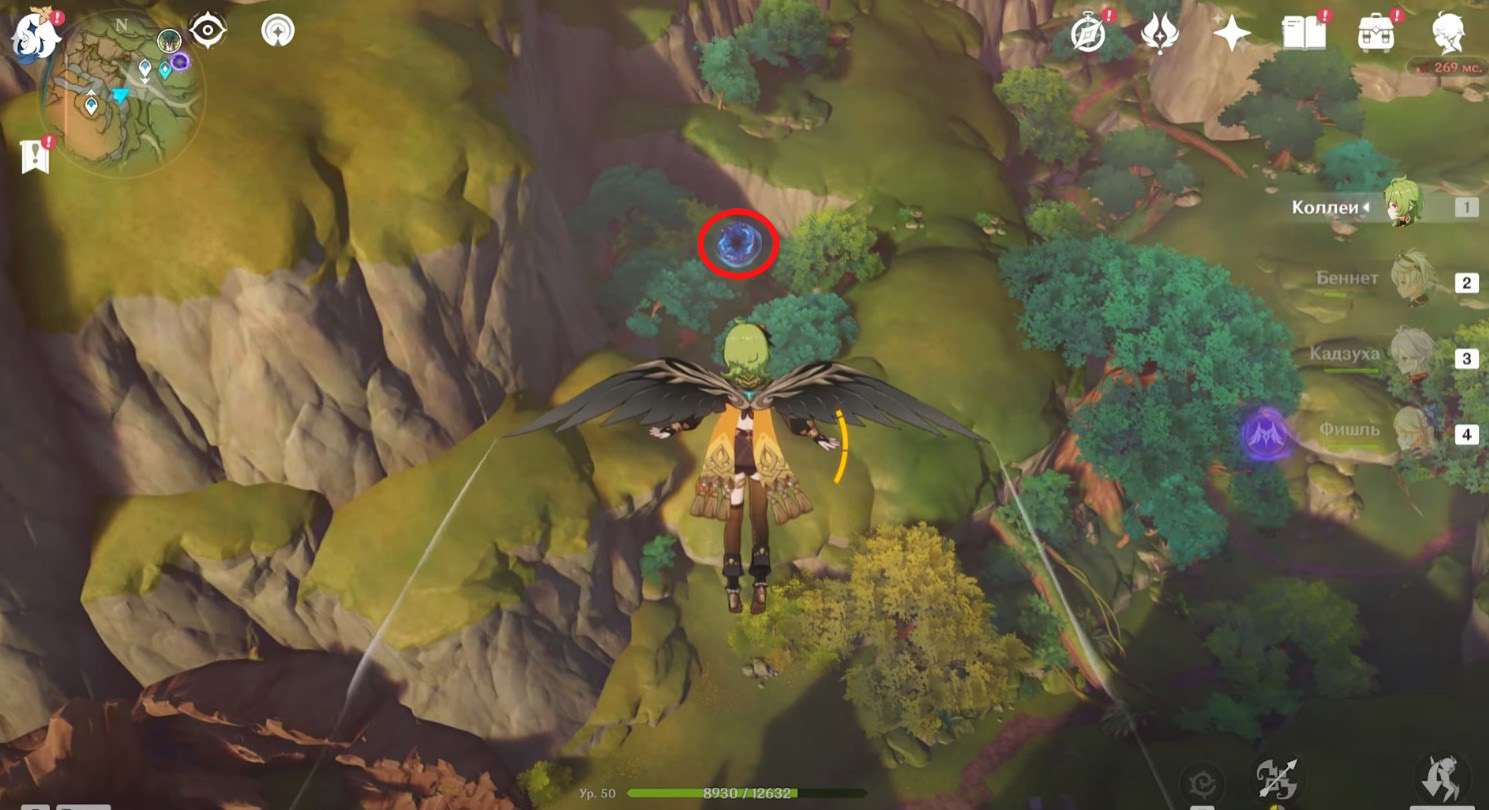
If you do not have enough stamina or height to fly to the portal, then use the second method. Move to the same teleporter or just go to the cave shown in the pictures below. Go through it, deal with the molds and raise the camera up. If you can't reach the four-leaf symbol near the portal, then jump on the springy Mushroom, hitting it before this Electro attack.

Once in the area with the arena, immediately turn around and climb a little up the root to activate the teleport in the cave. As a result, in the future you will be able to instantly move to this enemy. By the way, the boss is restored within 2-3 minutes after his death - you need to teleport to another area or restart the game in order for him to respawn. However, do not forget that in order to collect rewards, you need to spend 40 units from it primordial resin.


Characteristics of the Feathered Mold
Considering this creature's homeland, it is not surprising that it has a high resistance to Dendro elements (80%). It also has a fairly moderate resistance (25%) to other elements, including physical damage, so both elemental and physical will be equally effective. packs of characters.

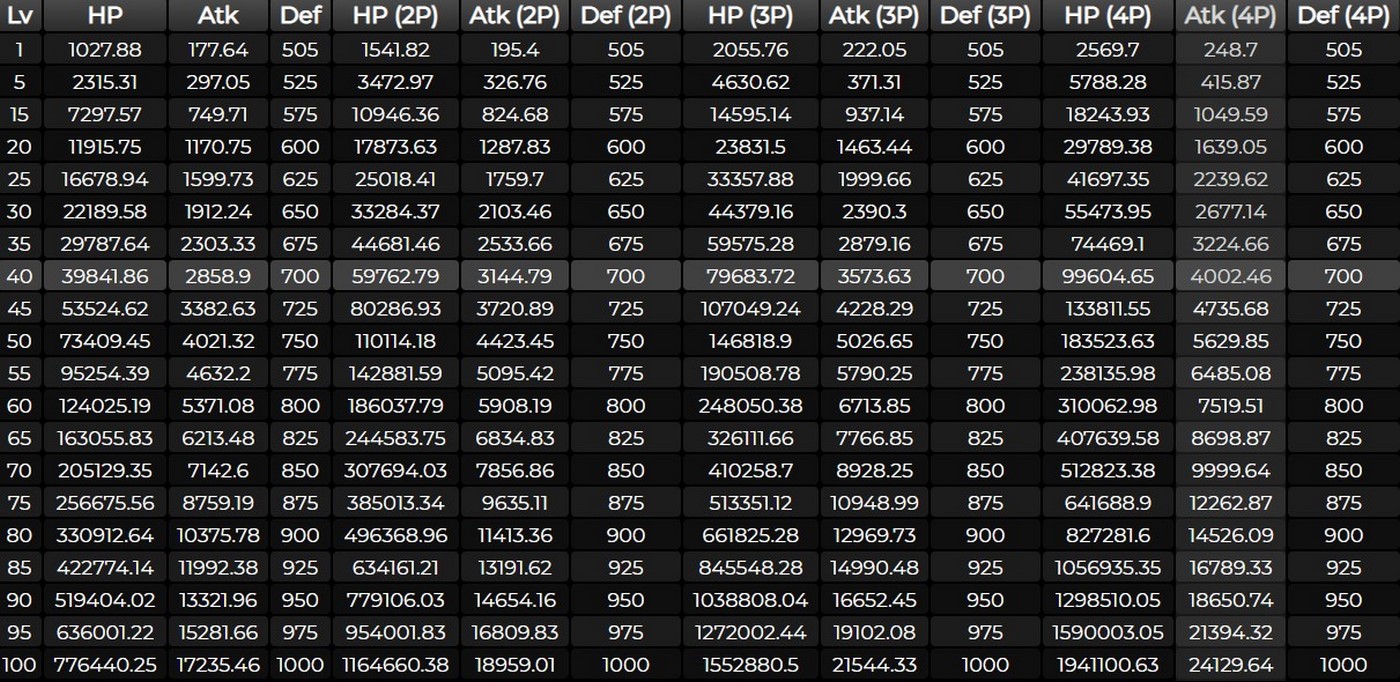
This enemy cannot be called super-living, since his HP is inferior to many other bosses, but he still cannot be defeated quickly. In addition, he is able to deal significant damage with his attacks, so you will have to use all your skill to avoid getting hit by him or take a good healer and shielder into your squad. You can see all the parameters of the boss in the image below (2P, 3P and 4P show the characteristics when playing in cooperative mode).
Featured Characters
Hero Selection Tips
The selection of fighters will depend on two main tactics for fighting this boss (read more below): through his stunning or keeping the enemy in a normal state. IN first case it is imperative to take Electro damage dealers to the squad in order to transfer the enemy to the Revive state, and then stun him. To speed up this process, you can add a pack of Dendro with a hero.
For second option it is necessary to take the characters of those elements that do not affect the change in the states of the boss. We are talking about Hydro, Cryo, Geo and Anemo fighters. In this case, the Jadeplume Terrorshroom will be in normal mode all the time, using sluggish standard attacks. Such tactics can increase the duration of the battle, but will save you from the most dangerous attacks of the enemy.
Let's add that there is also third option, involving the use of Pyro fighters. Due to their attacks, the boss will go into a Scorched state, throwing out spores from which molds will begin to be born, which will complicate the fight somewhat. However, if you use powerful and well pumped fire heroes, then the appearance of additional mobs should not be a problem for you.
Whichever option you end up choosing, it can be supplemented with Anemo characters to increase elemental damage, as well as healers (Sangonomiya Kokomi, Barbara, Kuki Shinobu, Dori) and shieldmen (Zhongli, Diona) to prevent the death of members of your squad.
Recommended Commands
Given the above information, we have formed several of the most optimal units, depending on the two battle tactics. Let's look at the first option first.
| Basic DPS | Minor DPS | Secondary DPS /Support | Support / Traveling Doctor |
|---|---|---|---|
|
Keqing |
Fischl |
Collei (Dendro Traveler) |
Zhongli |
|
Raiden Shogun |
Yae Miko |
Collei (Dendro Traveler) |
Zhongli |
|
Raiden Shogun |
Fischl |
Collei (Dendro Traveler) |
 |
|
Tighnari |
Yae Miko |
Yelan |
Zhongli |
|
Raiden Shogun |
Yae Miko |
Kujou Sara |
Jean (Dori) |
|
Sangonomiya Kokomi |
Yae Miko |
Fischl |
Sucrose |
|
Raiden Shogun |
Beidou |
Kujou Sara |
Kuki Shinobu |
|
Cyno |
Beidou |
Yelan |
Xingqiu |
|
Mona |
Beidou |
Fischl |
Jean |


For the second tactic, which does not involve influencing the boss, you can collect the following commands (the Pyro pack is indicated at the very bottom):
| Basic DPS | Minor DPS | Secondary DPS /Support | Support / Traveling Doctor |
|---|---|---|---|
|
Kamisato Ayaka (Ganyu) |
Tartaglia (Kamisato Ayato, Yelan) |
Venti (Kaedehara Kazuha) |
Diona |
|
Kamisato Ayato |
Kaedehara Kazuha |
Yun Jin |
Zhongli |
|
Kamisato Ayaka |
Kamisato Ayato |
Kaedehara Kazuha |
Sangonomiya Kokomi |
|
Sangonomiya Kokomi |
Yelan |
Xingqiu |
Kaedehara Kazuha |
|
Kamisato Ayaka |
Rosaria |
Kaedehara Kazuha |
Sangonomiya Kokomi |
|
Rosaria |
Chongyun |
Xingqiu |
Diona |
|
Hu Tao (Diluc, Eimiya, Yanfei) |
Xingqiu (Yelan) |
Kaedehara Kazuha |
Zhongli |


Attacks and Movements of the Feathered Mold
Depending on the state in which the boss is located, his attacks will also change. In this section, we will look at all enemy modes and their movements.
Normal state
Melee combo. The enemy performs a sweeping Bite, headbutts, and then attacks in a jump, dealing 80%, 80% and 100% of the attack power as Dendro damage. The boss at the same time imposes a Dendro aura on himself. This combo can consist of fewer attacks.
Barrage. The enemy briefly casts a Dendro aura on itself and swings its tail, launching a flurry of projectiles towards the player, each of which deals Dendro damage equal to 30% of ATK. He can perform this attack up to three times in a row.
Spore bombs. The enemy casts a Dendro aura on itself and spits several spores into the air that land on the arena and explode, dealing 50% ATK damage to Dendro in a large area.
State of Revival
The boss gains Activation when he is hit by an Electro attack (gauge increases by 2%) or reacts to him Catalysis (Stimulation, Growth and Aggravation). In the latter case, the scale of rage is filled immediately by 15%.
After the bar is full, the enemy will perform one of three special attacks, and then fall and lie on the ground for approximately 15 seconds, and his resistance to all types of damage with the exception of Dendro will drop to 0%. Next, consider the special moves of the Feathered Mold.
Rain of spores. The enemy casts a Dendro aura on itself, and then releases a huge amount of spores into the air, which fly towards the player and, on hit, deal Dendro damage equal to 45% of ATK. This attack is quite difficult to dodge - you need to run to the side, making jerks, as shown in the gif below.
Furious dash. The enemy casts a Dendro aura on itself and then rushes at the player twice, dealing Dendro damage on hit equal to 120% of ATK. This attack is pretty easy to dodge - just dash right in front of the boss.
Fast hits. Aimlessly swings its beak 4 times, dealing damage to Dendro with each swing equal to 120% of ATK. You just need to move away from the boss a little so as not to fall under his blows.
Burnt condition
The boss enters this mode if you attack him with a Pyro element. At the same time, Elemental Reaction: Burning practically does not damage him, and he himself does not become weaker in this state. In doing so, it fires 3 spores that explode after a while, dealing AoE damage to Dendro and creating molds.
After that, the Jadeplume Terrorshroom will return to its normal state. Molds, by the way, will already be in a burnt form when they appear. Up to four mushrooms can exist in the arena at the same time.
How to defeat the Feathered Mold
Preparing for battle
Before the start of the battle, you can eat dishes, which increase attack power, critical damage and critical hit chance, as well as drink potions that increase certain elemental damage (choose depending on the heroes used). We advise you to use the Dendrocide Potion, which will increase resistance to Dendro damage by 25% for 300 seconds, because almost all of the Feathered Mold's attacks deal this type of damage.
Stun Combat Tactics
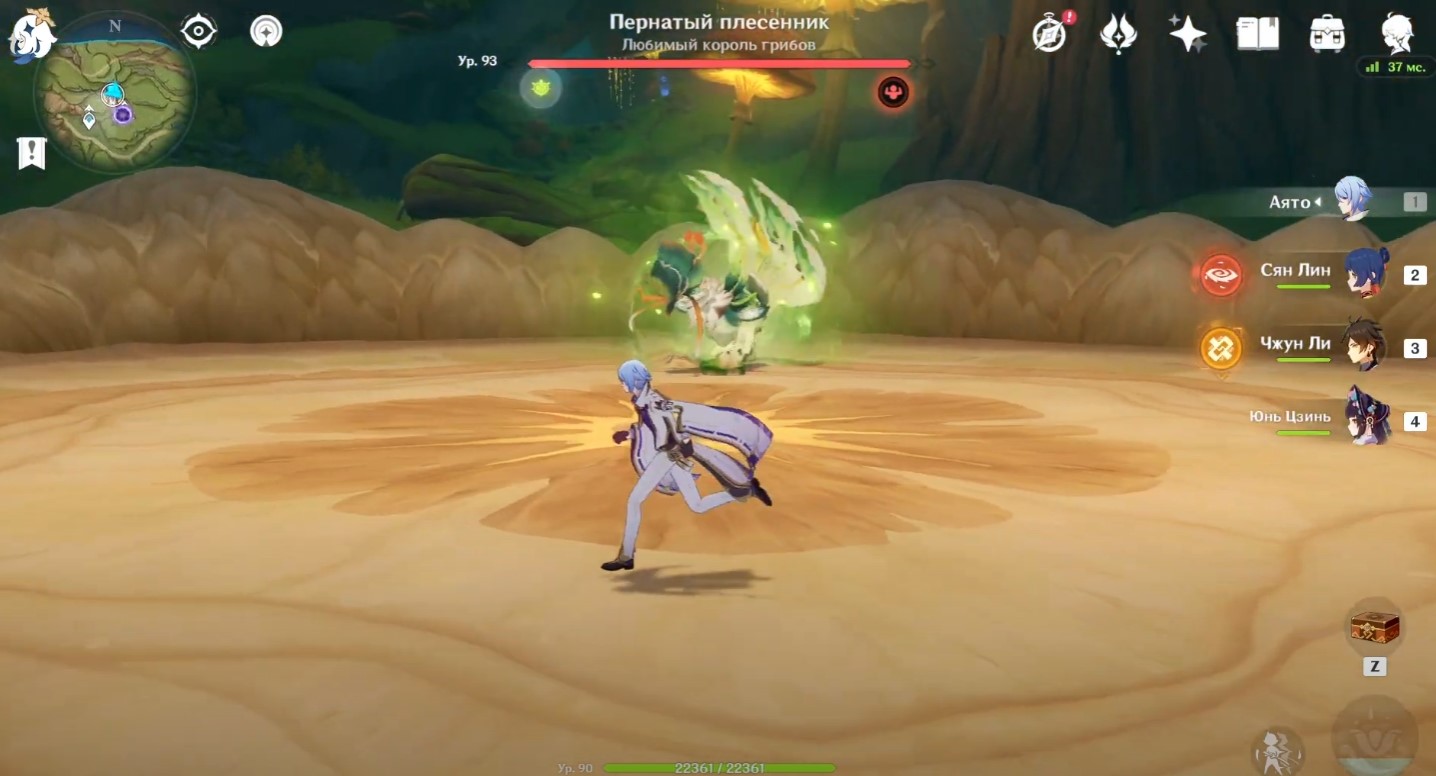
For this strategy, it will be enough to have only Electro heroes in the team, since the boss often imposes a Dendro status on himself, which makes it easier to call reactions that speed up the filling of the Activation bar (it hangs near the boss's health bar). By the way, it can be reduced by 34% by hitting Pyro with the elements.

When it fills up completely, the boss will perform one of his special attacks, which are pretty easy to dodge. After that, the enemy will fall to the ground, and you can safely hit him for about 15 seconds, causing significant damage, as his resistance to all elements will drop.

The only exception is Dendro's resistance, which will still be 55%, so it is not recommended to hit him with Dendro attacks even in a prone position. Then just repeat this process until you kill the enemy. Usually it can be destroyed after 1-2 stuns.
Combat tactics while maintaining normal state
Everything here is as simple as possible - do not hit Electro and Pyro with attacks, and also do not create Catalysis reactions so that the enemy is constantly in his normal mode. In it, he will perform simple attacks that are easy to dodge.
True, in this case, the fight may be delayed, since you will deal less damage to him than in a stunned state. Although with powerful and pumped damage dealers, the battle is unlikely to drag on for more than 5-10 minutes.
Achievements for the Feathered Mold
During the battle with this enemy, you can get two trophies at once. Next, we will tell you what you need to do to open them.
I’m a Flexitarian
Everything is quite simple here - you need to defeat this boss at least once in cooperative mode, that is, with other players. As a reward for unlocking the achievement, you get 10 primogems.
Three Strikes
This is where things get a little more difficult, as to get it you need to see all 3 special attacks that the enemy performs after entering the Revive state. Thus, you will need to hit him with Electro and call Catalysis, and then watch his movement, but do not attack him when he hits the ground.
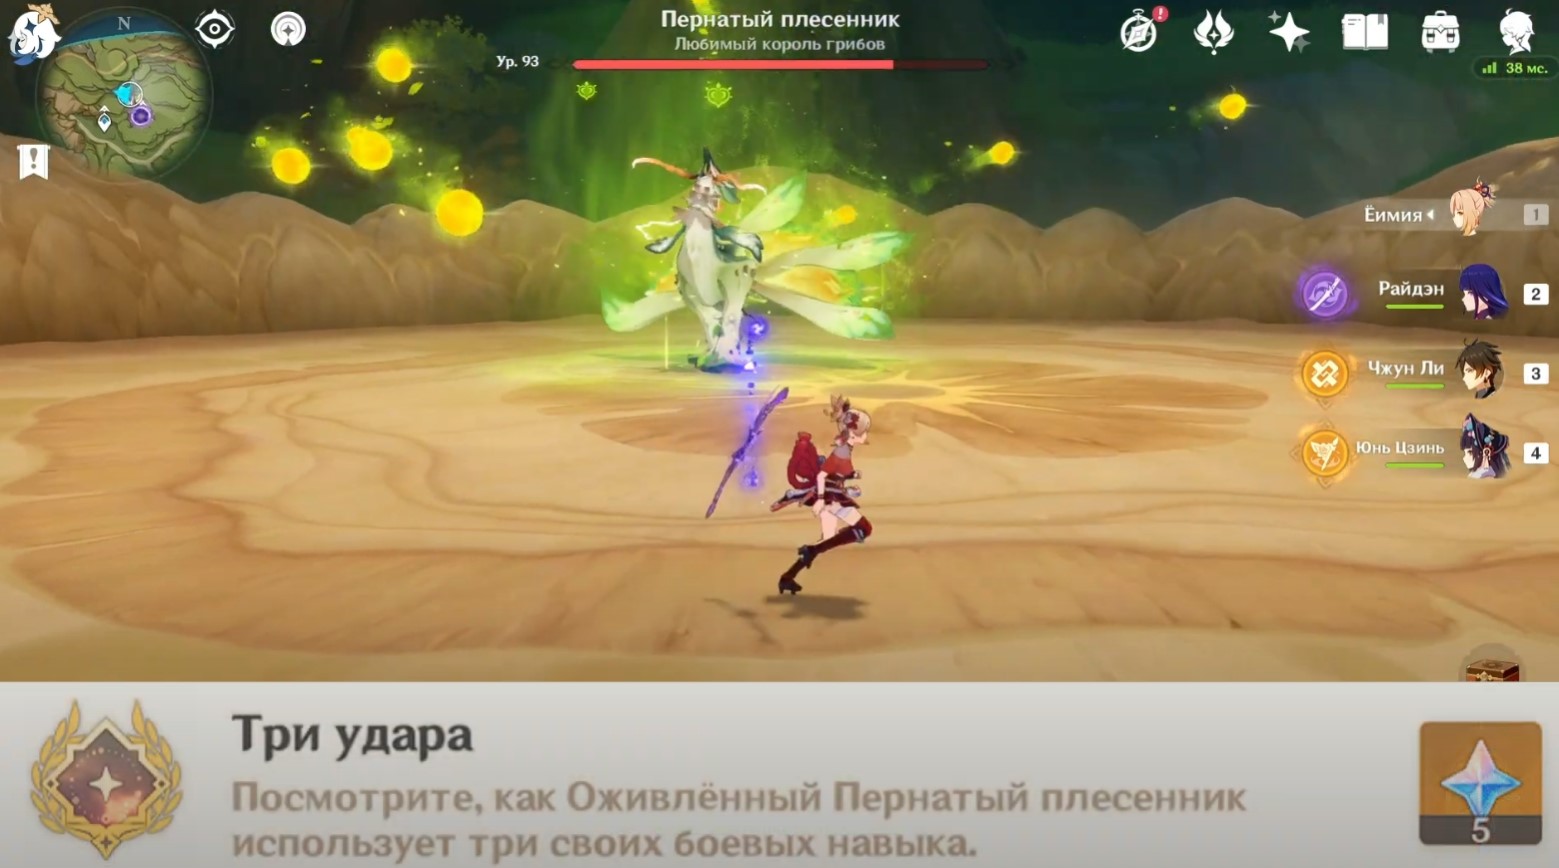
Keep putting it into animated mode until you've exhausted all of the Feather Mold's existing special attacks. This may well take more than 20-30 minutes, because the enemy will sometimes repeat his movements. As a reward for opening the achievement, you will receive 5 source stones.
Feather Mold Rewards
For defeating this giant bird, you will receive Companionship EXP, pestilence, adventure points and various materials that are mainly needed for the development of Dendro heroes. The higher the level of the enemy, the better the reward will be:
- Nagadus Emerald Sliver (Level 20+)
- Nagadus Emerald Fragment (Level 40+)
- Nagadus Emerald Chunk (Level 60+)
- Nagadus Emerald Gemstone (Level 75+)
- Majestic Hooked Beak (Level 30+) – Required for Ascension Tighnari And Collei.
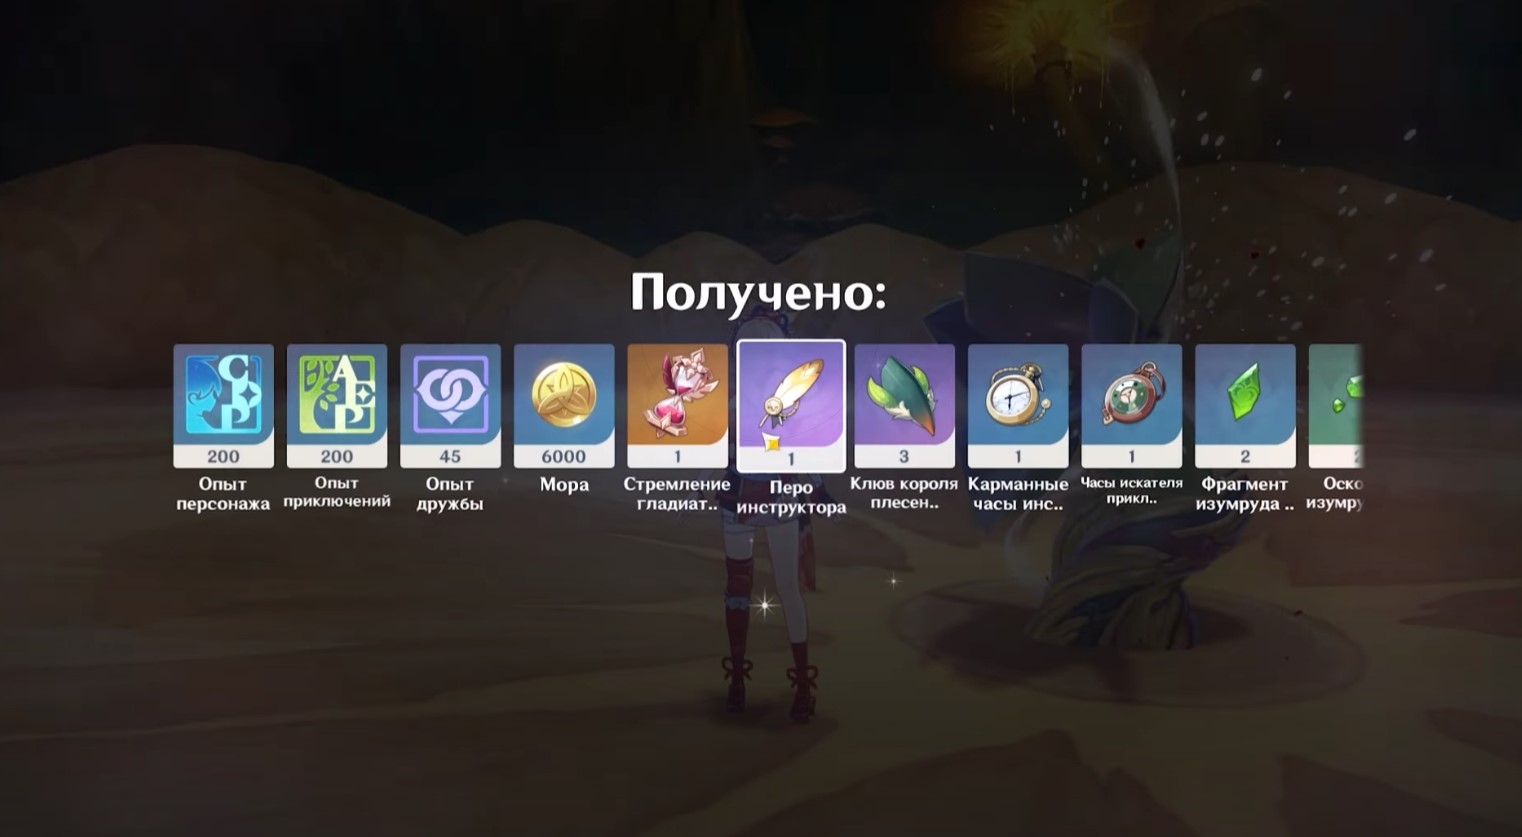
Among other things, various sets of artifacts fall out from this monster, namely:
- Adventurer (3 stars)
- Instructor (3-4 stars)
- Berserker (3-4 stars)
- Gladiator’s Finale (4-5 stars)
- Wanderer’s Troupe (4-5 stars)
We hope that our guide to the Feathered Mold in Genshin Impact will help you find and kill this boss, knowing in advance about the tactics of fighting him and preparing the optimal team for the fight.
Comments
You need to login to add comments.
You can login with