
In Genshin Impact Arlecchino is 5 star character, which belongs to the Pyro element and uses a spear in battle. In a team, she can play the role of the main damage dealer hypercarry. In this guide you will learn about her best builds, weapons and artifacts, as well as recommended units with her
Note: Harbinger of Fatui has not yet been officially released, so the data presented here is based on information obtained through beta testing. If necessary, we will update the guide when the heroine appears in the game.
Main features of Arlecchino
How to get Harlequin
In the first phase of update 4.6, this powerful Servant will appear in banner, which will increase the likelihood of it falling out. In the future, it will be possible to obtain this character only with the help of Prayers. Unfortunately, HoYoverse has never held an event where the reward would be a 5-star fighter, so you definitely won’t be able to get a Harbinger for free.

Harlequin Characteristics Progression
The table below shows how the heroine's basic parameters change as her level increases.
| Level | Base HP | Basic attack | Basic protection | Critical Damage Bonus |
|---|---|---|---|---|
| 1 | 1020 | 27 | 60 | 0% |
| 20 | 2646 | 69 | 154 | 0% |
| 40+ | 5889 | 154 | 344 | 9.6% |
|
60 |
8500 | 222 | 496 | 19.2% |
| 80 | 11561 | 302 | 675 | 28.8% |
| 90 | 13103 | 342 | 765 | 38.4% |
The standard critical damage and critical hit chance are 50% and 5% respectively.
Advantages and disadvantages of Harlequin
With the help of her unique abilities, the Harbinger can inflict enormous Pyro damage to both single and multiple targets. Its advantages also include:
- It has an unusual strengthening mechanic, tied to the use of Life Debt, which is not consumed over time and does not disappear if you leave the battlefield, which significantly simplifies rotation, since you do not need to guess the right moment to use abilities - you choose it yourself. This kind of gameplay will certainly appeal to veterans of the game who are tired of monotonous damage dealers.
- Capable of causing a Pyro infusion when a certain value of Life Debt is accumulated, and then extending it with the help of regular attacks (reduces the cooldown of E-shocks), causing increased damage. In addition, it will not disappear if you switch to another character.
- Pairs well with Hydro and Electro (with a small caveat) characters to help her create Steam and Elemental Reaction: Overloaded reactions. With it you can also assemble a mono Piro pack with more comfortable gameplay.
- Can independently heal itself with an elemental explosion.
- With You with elevation, critical damage increases, which makes the build somewhat easier, since more attention can be paid to the critical chance and attack power.
- She is able to independently increase her resistance to elemental and physical damage when increasing her attack power thanks to the “Only strength will protect” passive.
- To perform well as the main damage dealer, she does not require Constellations, which will certainly appeal to F2P players.
- Even the Gladiator’s Finale set, which many players have probably accumulated in huge quantities, can significantly increase damage, which will significantly simplify the selection of the necessary stats.
- When you hold down the charged attack button for a long time, it begins to float above the surface, making it easier to Achievement: Traversal certain obstacles, such as cuts and lakes. Flight can be accelerated by food or passive talents.
However, it is still impossible to call Harlequin an ideal character, since she also has her drawbacks:
- Due to the passive talent “Only ashes will satisfy”, she cannot receive healing from the outside, that is, it will not be possible to treat her with healers and dishes. You can remove Life Debt and restore health only with the help of an ult.
- For many newcomers, the gameplay of the harbinger may seem difficult, due to the need to constantly monitor the heroine’s health and Life Debt scale.
- Although the Elemental Burst costs relatively little (60 units), it will have to be used quite often for regular healing of the heroine. For this reason, care must be taken to increase its energy recovery. The weapons Favonia, the 4th Constellation and the second Pyro character can improve this situation a little.
- Due to the lack of support from healers and low resistance to interruption (if C1 is not open), it is highly recommended to take a good shieldman into your team.
- Steam is preferable to Elemental Reaction: Overloaded for Harlequin. It is recommended to select the second reaction only if Chevreuse is available. Of course, not all players have this character.
- Only the signature weapon Outline of the Scarlet Moon is ideal for the heroine’s abilities. The remaining spears will be noticeably worse. Moreover, only it will turn into a full-fledged scythe in the hands of the harbinger.
Harlequin's abilities
When performing a normal attack "Invitation to Execution" the heroine carries out up to 6 strikes with a spear, and when charged, makes a dash to the nearest enemy and strikes, spending a small amount of stamina. While performing a fall strike, she quickly rushes to the ground, hitting all enemies in her path, and after landing, she deals damage in an area.
If you hold down the charged strike button for a long time, the Harbinger continues to spend stamina while hovering above the ground for 5 seconds.
You should also know that if you have a Life Debt equal to or greater than 30% of your maximum health, Harlequin's Childe: Foul Legacy of the Red Death mode is activated, in which normal, charged, and falling hits of the character begin to cause Pyro damage. This buff cannot be canceled by another elemental infusion.
Let's add that the next normal attack inflicts additional damage on the enemy, proportional to the attack power of the harbinger, multiplied by a percentage of the current Life Debt, and spends 7.5% of it. Consumption of Life Debt occurs no more than once every 0.03 seconds, and the cooldown time of an elemental skill is reduced by 0.8 seconds.
Explanation: Without a boost, Harlequin's regular attacks are unremarkable (except that they are more sweeping than Hu Tao, so they are better suited for battles with large groups of enemies), but everything changes dramatically after activating the Childe: Foul Legacy of the Red Death state, which gives an additional boost. For example, if the normal multiplier at level 10 is 94%, then the additional one is 238%, that is, in general, the first auto attack will deal damage with a multiplier of 332%. But achieving such values will be very difficult.
First of all, we note that for the appearance of additional. strengthening requires Life Debt (we have information about it separate article ), which is applied by E-shka and the heroine’s passive, and the value of the multiplier will depend on the accumulated percentage of Life Debt (it is multiplied by it). For example, if you have 40% Life Debt, the total multiplier for the first normal hit will be 189% (94+238*0.3). To get the maximum 332% you need to have 100% Life Debt.
Let us add that Life Debt does not disappear on its own even after the character leaves the battlefield. It decreases when using normal attacks on the enemy - by 7.5% for each enhanced hit (the fourth basic attack is double, so it counts as 2). It should be taken into account that the percentage is taken from the total number of Life Debt, which decreases each time, that is, if it was equal to 70%, then the first enhanced blow will remove 5.25% (70 * 0.075) from it, the second - 4, 85% (64.75*0.075) and so on. As soon as the Life Debt drops below 30%, the enhanced state from Harlequin will be removed.
It is also important to remember that each hit will reduce the cooldown of an elemental skill by 0.8 seconds, so if you manage to perform at least 15 normal attacks, then the cooldown of the E-shka will be only 18 seconds instead of 30.
After using an elemental skill "Everything turns to dust" the heroine inflicts spike damage on nearby Pyro enemies and lunges towards one of them, dealing additional Pyro damage in the area. At the same time, the affected enemies are affixed with a Decree of Bloody Debt, which lasts half a minute and every 5 seconds inflicts one-time Pyro damage to targets (dealt up to two times and is E-shka damage).
When using a Charged Strike or Ultimate, Harbinger absorbs Blood Debt Decrees from nearby enemies, each inflicting Life Debt on her equal to 65% of her maximum health (up to 145% can be gained over 35 seconds). In the case of repeated use of the E-shka, the maximum value of the Life Debt and the duration of its accumulation are calculated anew.
Explanation: Everything here is relatively simple - after using the E-shka, the heroine performs two area attacks, imposing a debuff on enemies in the affected area. After using a charged strike or ult, she takes away these statuses from them, receiving Life Debt - from three enemies she will receive 145% (possible maximum). The limits can be increased if you manage to re-activate the skill within 35 seconds (regular hits and the ultimate will help you).
Elemental Burst "Rising of the Fatal Moon" gives her the ability to deal Pyro damage in an area, reset the cooldown of an elemental skill, and restore her health in proportion to her Life Debt and attack power.
Explanation: With the help of your ult, you can inflict significant Pyro damage to nearby enemies, remove the Blood Debt from your opponents, and heal Harlequin for 150% of the existing Life Debt + 150% of the attack power. If you, for example, have 1500 ATK and have collected 40% of Life Debt, then after activating an elemental explosion, you will completely remove the debt from yourself and be healed by 20% of your maximum health + 2250 HP.
In this case, you will lose all the effects of the E-shka, that is, the rotation will start from scratch, and you will be able to immediately activate the skill again and start all over again. Thus, the ult is a kind of lifeline, allowing you to instantly heal Harlequin if she is on the verge of death. If you want to get a more comfortable gameplay, then we advise you to use an Elemental Burst every rotation.
It is also impossible not to mention the extremely useful passive talents of the Harbinger of Fatui. The first one is called "Only suffering can atone" and gives the Decree of Blood Debt additional features:
- When destroying an enemy with the Decree of Blood Debt, the heroine receives Life Debt equal to 130% of her maximum health.
- 5 seconds after being applied, it turns into Blood Debt: Collection, which, if consumed, gives Harlequin Life Debt of 130%. However, the limits remain the same.
Second - Only strength will protect – gives 1% resistance to all elemental and physical damage for every 100 units of attack power over 1000 units. Maximum stability can increase to 20% (this will require 3000 ATK).
As for the third passive "Only ashes will satisfy", then during the battle she gives the heroine a 40% bonus to Pyro damage, but at the same time she can only be healed with the help of her ult. In peacetime, you can treat by any means.
Harlequin constellations
To open them, you need to accumulate the character’s Luck, which is given out when duplicates of the heroine appear, which, of course, is random. Given the low chance of getting 5-star characters, you will need to spend a lot of time and money to unlock all the constellations. However, even without them, Harlequin can perfectly play the role of main DD.
If you still decide to try your luck, you can stop at C1, which increases the damage dealt and provides resistance to interruption, making the gameplay as the Harbinger more comfortable. However, if you have a choice between this constellation and a signature weapon, then we recommend taking the signature if there is no good alternative spear.
Here is the complete list of constellations:
- I will bear all the retributions and responsibilities... – strengthens the Mask of the Red Death by 100%, and when it is in effect, Harlequin’s resistance to interruption increases when she makes regular and charged attacks.
- For good deeds and sins, I will repay... - immediately turns the Order of Bloody Debt into Bloody Debt: Retribution, and when absorbed, the heroine inflicts Pyro damage in an area in the amount of 900% of her attack power in front of her. This effect occurs once every 10 seconds.
- You will become a new member of our family - your skill level increases by three. Maximum level: 15th.
- From now on, love and protect each other... – when absorbing the Decree of Blood Debt, the cooldown of the ult is reduced by 2 seconds, and it restores 15 units of energy. The effect occurs once every 10 seconds.
- Alone, we are as good as dead – the ult level increases by three. Maximum level: 15th.
- Let's rejoice in our new life With You - increases the damage from the ult in proportion to the attack power multiplied by 700% of the current Life Debt value. After using the skill, critical damage from normal hits and ultimate increases by 10% and 70%, respectively, for 20 seconds. The effect occurs once every 15 seconds.
How to play as Harlequin
All these numbers and scales may make it seem like the Harbinger of Fatui is incredibly difficult to play, but that's actually not the case. The main thing to remember is that its entire gameplay is built around the accumulation of Life Debt, which you will receive using an elemental skill or signature weapon (if you have one).
You'll simply need to use the E-shka in a cluster of enemies, then perform a charged attack or defeat enemies with a debuff to gain enough Life Debt to activate the Childe: Foul Legacy of the Red Death. After this, you need to start spamming regular hits, which will cause increased Pyro damage and reduce Life Debt.

In this case, you don’t have to look at the time at all, since the duration of this state depends only on the simple attacks you carry out. You can even safely switch to another character - Life Debt and infusion will not be lost anywhere. This makes it much easier to fight bosses that become unattackable at certain periods of time, since you no longer have to guess the right moment to attack them.
You may only have problems with the heroine’s survivability, since you won’t be able to treat her using conventional methods, so you should think about adding a good shield member to your team. You can also try activating your ult at the end of each rotation, and then Harlequin will be able to heal himself about once every 15-20 seconds.
In general, the optimal rotation for Harlequin looks like this:
- Start the battle with the heroine's elemental skill to impose the Decree of Blood Debt on your opponents.
- Switch to other supports and sub-dealers to strengthen the main damage dealer and prepare to create reactions.
- After activating the E-Shki, 5 seconds should pass (they will just be spent activating the abilities of other squad members), and only then you need to use a charged blow to absorb Blood Debt: Collection, which gives more percent of the Life Debt. If you have open C2, then you don’t have to adhere to this condition.
- After accumulating Life Debt, start performing enhanced normal attacks. It is advisable to perform 15-16 strikes so that the E-shki's cooldown time is reduced by almost half. You don't have to bother and just use basic attacks without any control, but you should know that the sixth swing is quite slow, so it makes sense to dash after the fourth or fifth blow.
- As soon as the Red Death Childe: Foul Legacy wears off and the skill is available, immediately reuse it to gain additional energy. If everything is fine with Harlequin, then simply continue the above combination. Otherwise, use an Elemental Burst to restore the heroine’s health.
Best builds for Harlequin
Best weapon
When choosing a spear, priority should be given to those specimens that increase critical damage, the chance of critical hits and attack power, as well as strengthen normal attacks and grant Life Debt. The table below presents the most interesting options.
| Name and rarity | Characteristics (level 1-90) | Passive ability |
|---|---|---|
|
Outline of the Scarlet Moon (5 stars) |
Crit chance: 4.8%~22.05% Base Attack: 48~674 |
When a charged strike hits an enemy, it inflicts Life Debt equal to 25% of maximum health. This effect occurs once every 14 seconds. While the owner has Life Debt, the damage they deal increases by 12-28%. If the Life Debt indicator is equal to or higher than 30% of maximum HP, then the damage dealt increases by 24-56%. Harlequin's signature, which fits perfectly with it, as it is the only spear that gives the wearer Life Debt. In addition, it increases the chance of a critical hit, so artifacts can pay more attention to attack power and energy recovery. |
|
Staff of the Scarlet Sands (5 stars) |
Critical hit chance: 9.6%~44.1% Base Attack: 44~542 |
Increases the attack bonus by 52% of the hero's elemental mastery. When hitting an enemy with an elemental skill, the character's attack bonus increases by 28% of the elemental mastery for 10 seconds. The bonus can be stacked up to three times. The second most powerful spear in Steam teams, as it significantly increases damage from reactions. The crit chance also simplifies the selection of artifacts. The disadvantages include the relatively low base attack. Plus, in terms of overall damage, this weapon will be noticeably inferior to its signature. |
|
Primordial Jade Winged-Spear (5 stars) |
Critical hit chance: 4.8%~22.1% Base Attack: 48~674 |
When hitting enemies, attack power increases by 3.2~6.0 percent for 6 seconds. The effect stacks up to 7 times and only appears once every 0.3 seconds. When reaching stack level 7, damage increases by 12~24 percent. In mono Pyro packs and in Overload squads, it will be a more suitable option than the Staff of the Scarlet Sands - all thanks to the significant increase in attack power, on which Harlequin’s damage actually depends (as well as its healing), and overall damage. The crit chance also simplifies the selection of artifacts. However, again, this weapon is still quite far behind the signature. |
|
Staff of Homa (5 stars) |
Critical Damage: 14.4%~66.2% Base Attack: 46~608 |
Increases health by 20 percent and increases attack bonus by 0.8 percent of maximum HP. If the life bar drops below half, the attack increases by an additional 1 percent. Increases Harlequin's survivability, so you can use your ultimate less often and its attack power, but to a lesser extent than Primordial Jade Winged-Spear. Significantly increases critical damage, so in artifacts all efforts can be directed to finding a critical chance. |
|
Calamity Queller (5 stars) |
Attack Power: 3.6%~16.5% Base Attack: 49~741 |
When equipped, using an elemental skill increases attack power by 3.2 percent per second. The effect lasts 20 seconds, stacks up to 6 times and doubles if the character is not on the battlefield. It also increases any elemental damage by 12 percent. A more preferable weapon than the Staff of Homa when it comes to teams playing through Steam, as it allows you to increase elemental damage. It gives a noticeable increase in attack power, but does not increase crits, which is why you will have to get them from artifacts. |
|
Skyward Spine (5 stars) |
Obtaining Energy: 8%~36.8% Base Attack: 48~674 |
Increases crit chance by 8 percent and standard attack speed by 12 percent. In addition, hitting enemies with normal and charged attacks has a 50 percent chance of summoning an intangible blade that deals 40 percent of the attack's area damage. This effect triggers no more than once every 2 seconds. Thanks to VE, you will be able to use your ultimate more often, and, therefore, increase Harlequin's survivability. Plus, this weapon slightly increases the crit chance and speeds up normal attacks, which are the main source of damage for the heroine, so the second part of the passive will work regularly. |
|
Vortex Vanquisher (5 stars) |
Attack Power: 10.8%~49.6% Base Attack: 46~608 |
Increases shield strength by 20%~40%. Increases attack by 4%~8% for 8 seconds when hitting enemies. The bonus stacks up to five times and occurs once every 0.3 seconds. When a character is protected, the power of the effect increases by 100%. A good option for Harlequin, which allows you to significantly increase her attack power, and, consequently, all damage. But the team with her must have a shield member. |
|
Deathmatch (4 stars) |
Critical hit chance: 8%~36.8% Base Attack: 41~454 |
When there are two or more opponents nearby, the character’s attack and defense increases by 16 percent, and if there are fewer, the attack power increases by 24 percent. The best option for Harlequin among 4-star copies, especially in Overload or mono Pyro teams. Allows you not to think about the chance of a crit and increases your attack power quite well. Unfortunately, the basic attack of the spear leaves much to be desired. |
|
Ballad of the Fjords (4 stars) |
Crit chance: 6.8%~27.6% Base Attack: 42~510 |
Increases elemental mastery by 120-240 units if the team has three characters of different elements. In squads on Steam it shows itself no worse than Mortal Kombat, but in others it will be noticeably worse. In general, it’s definitely not worth pulling him out of the power supply just for the sake of Arlecchino. |
|
Blackcliff Pole (4 stars) |
Critical Damage: 12%~55.1% Base Attack: 42~510 |
When killing enemies, attack power increases by 12%~24% for half a minute. The bonus can be stacked up to three times. It works well when fighting large groups of enemies, but when fighting bosses you can forget about its passive. In addition, you will have to increase your crit chance with artifacts. |
|
Dragon’s Bane (4 stars) |
Elemental Mastery: 48-221 Base Attack: 41~454 |
Increases damage by 20%~36% when fighting enemies affected by Pyro or Hydro. Well suited when playing through Steam, as this spear can increase Harlequin's personal damage and overall damage from elemental reactions. However, you will have to look for attack power, critical damage and crit chance in artifacts. |
|
White Tassel (3 stars) |
Critical hit chance: 5.1%~23.4% Base Attack: 39~401 |
Increases damage from normal attacks by 24%~48%. At rank 5, Awakening can rival even BP weapons in terms of damage, so if you don’t have 5-star options or Deathmatch, you can totally use this spear. |


Best Artifacts
As in the case of spears, we recommend taking artifacts that can increase crits and attack power, as well as enhance regular attacks. The table below shows the best options.
| Artifacts | Bonuses | Advantages |
|---|---|---|
|
Fragment of harmonic fantasies |
2 pieces: Increases attack power by 18%. 4 pieces: Increases damage dealt by the wearer by 18% for 6 seconds when Life Debt decreases or increases. The bonus can be stacked up to three times. |
An ideal set for Harlequin, which significantly increases her damage (by 54%), since the set’s passive will trigger almost constantly. |
|
The Gladiator’s Finale |
2 pieces: Increases attack power by 18%. 4 pieces: Increases damage from normal attacks by 35% when using one-handed, two-handed or polearm weapons. |
A good alternative to the previous set (weaker than it by only 6%), which significantly strengthens Harlequin, because she deals the main damage with ordinary attacks. In addition, it will be much easier to get artifacts with the necessary stats, because they drop out from all elite bosses. |
|
The Gladiator’s Finale |
2 pieces: Increases attack power by 18%. | If you do not have complete sets of the above sets with the required characteristics, then you can temporarily use 2 parts of these sets. The main thing is that they have good stats. |
|
Crimson Witch of Flames |
2 pieces: Increases Pyro damage by 15%. | |
|
Marechaussee Hunter |
2 pieces: Increases damage from normal and charged attacks by 15%. |


Concerning main characteristics of artifacts, then take the hourglass for Attack, the cup (chalice) for the Pyro damage bonus (or Attack), and the crown (hat) for crit. chance/crit. damage in the ratio of 1 to 2. The priority for choosing secondary parameters is as follows: Obtaining Energy (to the required value), crits, attack and elemental mastery.
It’s worth talking separately about the appropriate meaning Energy restoration for the harbinger. If you don't have a battery in the form of a second Pyro hero and supports with the Favonius weapon, you may need 150-165% VE. For each additional Pyro character you can take away 10-15%, for unlocked C4 - 35-40%, and for the Favonius weapon - another 10-15%.
The best commands for Harlequin
With the Harbinger of Fatui, you can assemble good units for Overload and Steam, as well as mono Pyro packs. We do not recommend taking a healer, since he will still not be able to heal Harlequin, so priority should be given to shield warriors. To the exception, you can add healers who can additionally apply a good Noelle: Protector.
In theory, Bennett could be an extremely useful support for Arlequin due to the ability to significantly increase her attack power and make it easier to accumulate energy. However, in this case you will have to constantly be in a limited circle, which can lead to more difficult gameplay, especially if there is no resistance to interruption and no shield guard. Therefore, decide for yourself whether this gameplay is suitable for you or not.
Let us add that when deciding to create a team for Overload, Chevreuse must be present in it, since without it the total damage of the squad will be significantly inferior to the DPS of the pack playing through Steam. The table below shows the most interesting command options.
| Maine-DD | Sub-DD | Sub-DD/Support | Support |
|---|---|---|---|
|
Harlequin |
Fischl |
Chevreuse |
Bennett (Thoma, Dehya, Beidou) |
|
Harlequin |
Raiden Shogun |
Chevreuse |
Xinyan (Thoma, Beidou, Dehya) |
|
Harlequin |
Yae Miko |
Chevreuse |
Yanfei (C4) |
|
Harlequin |
Yelan (Xingqiu) |
Kaedehara Kazuha (Sucrose) |
Bennett |
|
Harlequin |
Yelan (Xingqiu) |
Zhongli (Layla) |
Bennett |
|
Harlequin |
Yelan |
Xingqiu |
Bennett |
|
Harlequin |
Yelan |
Mona |
Zhongli |
|
Harlequin |
Yelan |
Tiori |
Zhongli |
|
Harlequin |
Navia |
Zhongli |
Bennett |
|
Harlequin |
Xiangling (Dehya) |
Kaedehara Kazuha (Zhongli, Lynette) |
Bennett |


Leveling up Harlequin
How to improve your skills
You have to search and collect a wide variety of materials, namely:
- Teachings, guidelines and philosophies about "Order" - obtained on Wednesdays, Saturdays and Sundays in the Pale Forgotten Glory dungeon.
- Recruit’s Insignia, Sergeant’s Insignia and Lieutenant’s Insignia - drop from Skirmishers of Fatui, Agents of Fatui and Qiqin Mages of Fatui, are bought with Starglitter or created using Alchemy.
- Unknown Material - Dropped by the weekly Servant boss.
- Crown of Insight – can be obtained during events, as well as by upgrading the Sacred Sakura, the Permafrost Tree, the Tree of Dreams and the Lucin Fountain.
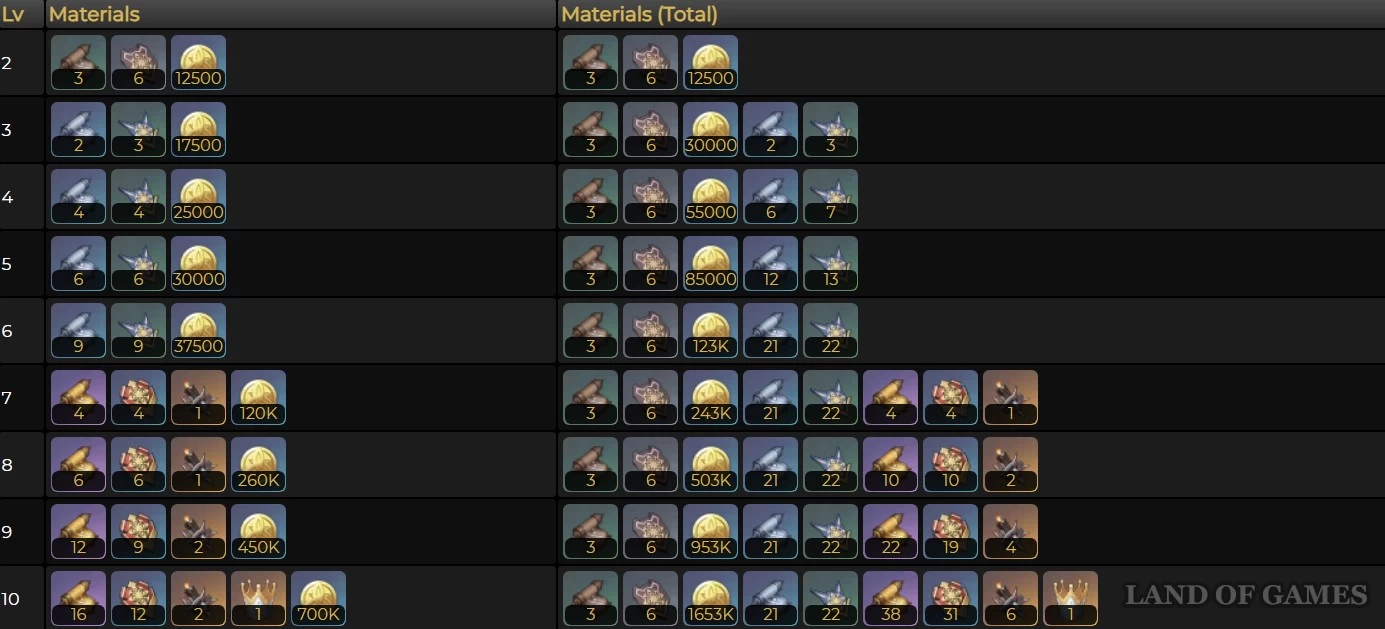
If we talk about priority of upgrading talents, then the first thing you need to do is increase your normal attacks. Then you can take on the Elemental Burst and only at the end begin to level up the elemental skill.
How to level up a character
Get ready to search and collect a lot of different materials. Their list and methods of extraction are given below.
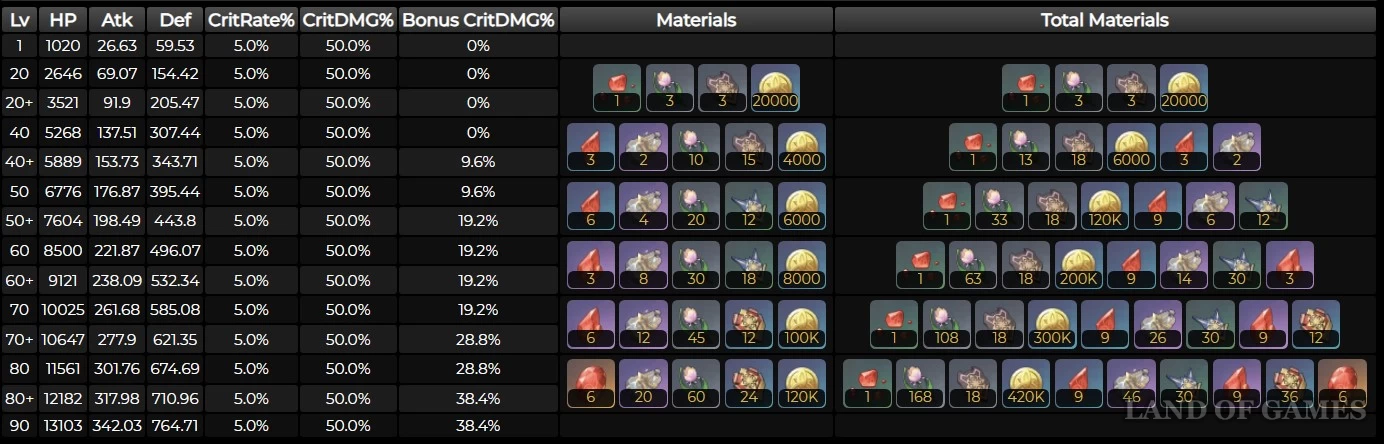
You can get Agnidus agate from Piro Orchids , Lupus Borealis , Ancient Geovishap , Pyro of Hypostasis , Azhdakhi , Seniors And APMona . A Golden Melody Fragment drops from the Golem Captain boss. Rainbow roses are a local specialty of Fontaine - in separate guide we have indicated their location.
Comments
You need to login to add comments.
You can login with